Blinkies


Sunday, July 24, 2011
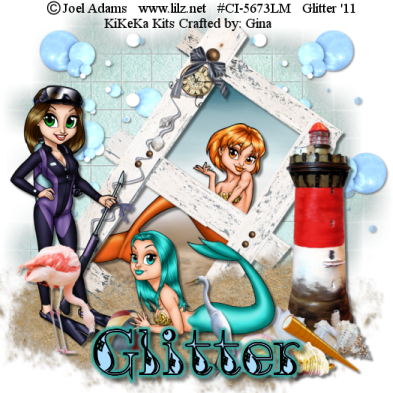
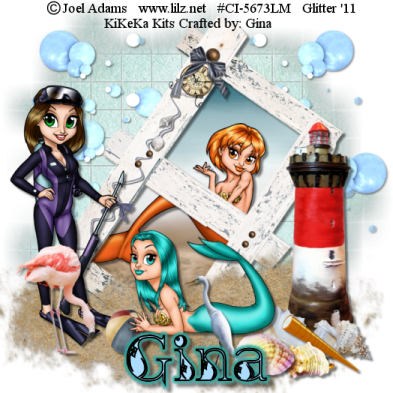
By The Sea
This tut is entirely my creation. Any resemblances are purely coincidental.
 Supplies
Scrap Kit: By The Sea by KiKeKa Kits
HERE
Mask: WSL_84
HERE
3 Tubes by the same artist: I used tubes by Joel Adams which I purchased through CILM. You can get the tubes at CDO. Please don’t use these tubes without purchasing them. You must also get a license number from CDO.
HERE
Font: Kingthings Inkydink
HERE
Open a new canvas and go to Images, canvas resize 760 x 760. We will resize at the end.
Open cbg_bythesea_paper07. Resize by 99% to get to 100%. Copy & paste into your canvas. Open mask. Go to layers, new mask layer, from image. Merge group. I added a drop shadow of 1, 1, 50, 5.
Open cbg_bythesea_bubbles01. Copy & paste onto your canvas. Resize 50% then 80% all layers NOT checked. Place in upper right. Duplicate, mirror. Duplicate original again and rotate 45%. Merge all 3 bubble layers, add a drop shadow of 2, 2, 50, 5.
Open cbg_bythesea_frame02. Copy and paste onto your canvas. Rotate right 35%.
Open Use your magic and click inside both frame holes. Selections, modify, expand by 12. Keep repeating expand until you get the ants to cover all the inside of your frame. This will make it have the ants outside the frame itself in a few places. Open paper cbg_bythesea_paper02. Resize 99%, then 75% all layers checked. Copy & paste onto canvas and place under frame. Resize until you get the picture you want. Selections, invert, hit delete key on keyboard. Selections, select none.
Open cbg_bythesea_lighthouse. Copy and paste onto your canvas. Resize 80% and place to the right of frame.
Open the following elements and copy and paste them onto your canvas, one at a time. Resize each one to your liking and place where you want them.
Cbg_bythesea_scpoe
Cbg_bythesea_shell01
Cbg_bythesea_shell02
Cbg_bythesea_shell03
Cbg_bythesea_shell04
Cbg_bythesea_ball01
Cbg_bythesea_bird01
Cbg_bythesea_bird02 Mirror both birds
Give each of your elements and frame a drop shadow of 2, 2, 50, 5.
Open up cbg_bythesea_sand. Copy and paste sand onto your canvas 4 times. Rearrange sand to your liking. Merge all sand together and add drop shadow of 1, 1, 50, 5.
Open up tubes. Copy and place where you want them. Resize as needed. Place a drop shadow of 2, 2, 50, 5.
Mask and sand have a drop shadow of 1, 1, 50, 5. Everything else has a drop shadow of 2, 2, 50, 5.
Here I save it in psp form to move things if need be. Merge visible, resize 97% all layers NOT checked. Resize again down so your canvas is not larger than 525 x 525.
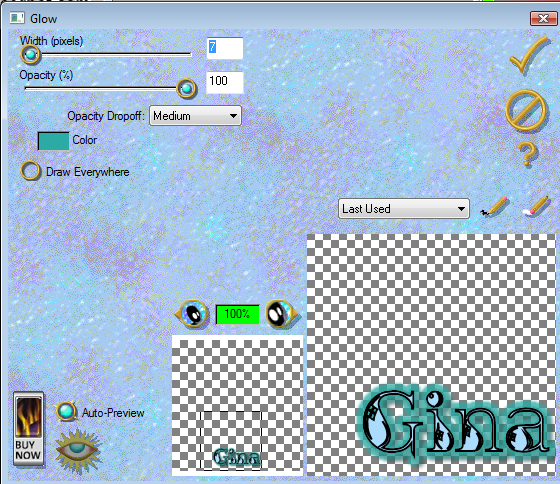
Add your copyright info, add name (I put a glow on my name, see below), and we are done.
Supplies
Scrap Kit: By The Sea by KiKeKa Kits
HERE
Mask: WSL_84
HERE
3 Tubes by the same artist: I used tubes by Joel Adams which I purchased through CILM. You can get the tubes at CDO. Please don’t use these tubes without purchasing them. You must also get a license number from CDO.
HERE
Font: Kingthings Inkydink
HERE
Open a new canvas and go to Images, canvas resize 760 x 760. We will resize at the end.
Open cbg_bythesea_paper07. Resize by 99% to get to 100%. Copy & paste into your canvas. Open mask. Go to layers, new mask layer, from image. Merge group. I added a drop shadow of 1, 1, 50, 5.
Open cbg_bythesea_bubbles01. Copy & paste onto your canvas. Resize 50% then 80% all layers NOT checked. Place in upper right. Duplicate, mirror. Duplicate original again and rotate 45%. Merge all 3 bubble layers, add a drop shadow of 2, 2, 50, 5.
Open cbg_bythesea_frame02. Copy and paste onto your canvas. Rotate right 35%.
Open Use your magic and click inside both frame holes. Selections, modify, expand by 12. Keep repeating expand until you get the ants to cover all the inside of your frame. This will make it have the ants outside the frame itself in a few places. Open paper cbg_bythesea_paper02. Resize 99%, then 75% all layers checked. Copy & paste onto canvas and place under frame. Resize until you get the picture you want. Selections, invert, hit delete key on keyboard. Selections, select none.
Open cbg_bythesea_lighthouse. Copy and paste onto your canvas. Resize 80% and place to the right of frame.
Open the following elements and copy and paste them onto your canvas, one at a time. Resize each one to your liking and place where you want them.
Cbg_bythesea_scpoe
Cbg_bythesea_shell01
Cbg_bythesea_shell02
Cbg_bythesea_shell03
Cbg_bythesea_shell04
Cbg_bythesea_ball01
Cbg_bythesea_bird01
Cbg_bythesea_bird02 Mirror both birds
Give each of your elements and frame a drop shadow of 2, 2, 50, 5.
Open up cbg_bythesea_sand. Copy and paste sand onto your canvas 4 times. Rearrange sand to your liking. Merge all sand together and add drop shadow of 1, 1, 50, 5.
Open up tubes. Copy and place where you want them. Resize as needed. Place a drop shadow of 2, 2, 50, 5.
Mask and sand have a drop shadow of 1, 1, 50, 5. Everything else has a drop shadow of 2, 2, 50, 5.
Here I save it in psp form to move things if need be. Merge visible, resize 97% all layers NOT checked. Resize again down so your canvas is not larger than 525 x 525.
Add your copyright info, add name (I put a glow on my name, see below), and we are done.
 I hope you enjoyed my tut.
If you do any of my tuts please send to me at my email addy of glitterdeb75@yahoo.com and I will put them on my blog.
I hope you enjoyed my tut.
If you do any of my tuts please send to me at my email addy of glitterdeb75@yahoo.com and I will put them on my blog.
 Supplies
Scrap Kit: By The Sea by KiKeKa Kits
HERE
Mask: WSL_84
HERE
3 Tubes by the same artist: I used tubes by Joel Adams which I purchased through CILM. You can get the tubes at CDO. Please don’t use these tubes without purchasing them. You must also get a license number from CDO.
HERE
Font: Kingthings Inkydink
HERE
Open a new canvas and go to Images, canvas resize 760 x 760. We will resize at the end.
Open cbg_bythesea_paper07. Resize by 99% to get to 100%. Copy & paste into your canvas. Open mask. Go to layers, new mask layer, from image. Merge group. I added a drop shadow of 1, 1, 50, 5.
Open cbg_bythesea_bubbles01. Copy & paste onto your canvas. Resize 50% then 80% all layers NOT checked. Place in upper right. Duplicate, mirror. Duplicate original again and rotate 45%. Merge all 3 bubble layers, add a drop shadow of 2, 2, 50, 5.
Open cbg_bythesea_frame02. Copy and paste onto your canvas. Rotate right 35%.
Open Use your magic and click inside both frame holes. Selections, modify, expand by 12. Keep repeating expand until you get the ants to cover all the inside of your frame. This will make it have the ants outside the frame itself in a few places. Open paper cbg_bythesea_paper02. Resize 99%, then 75% all layers checked. Copy & paste onto canvas and place under frame. Resize until you get the picture you want. Selections, invert, hit delete key on keyboard. Selections, select none.
Open cbg_bythesea_lighthouse. Copy and paste onto your canvas. Resize 80% and place to the right of frame.
Open the following elements and copy and paste them onto your canvas, one at a time. Resize each one to your liking and place where you want them.
Cbg_bythesea_scpoe
Cbg_bythesea_shell01
Cbg_bythesea_shell02
Cbg_bythesea_shell03
Cbg_bythesea_shell04
Cbg_bythesea_ball01
Cbg_bythesea_bird01
Cbg_bythesea_bird02 Mirror both birds
Give each of your elements and frame a drop shadow of 2, 2, 50, 5.
Open up cbg_bythesea_sand. Copy and paste sand onto your canvas 4 times. Rearrange sand to your liking. Merge all sand together and add drop shadow of 1, 1, 50, 5.
Open up tubes. Copy and place where you want them. Resize as needed. Place a drop shadow of 2, 2, 50, 5.
Mask and sand have a drop shadow of 1, 1, 50, 5. Everything else has a drop shadow of 2, 2, 50, 5.
Here I save it in psp form to move things if need be. Merge visible, resize 97% all layers NOT checked. Resize again down so your canvas is not larger than 525 x 525.
Add your copyright info, add name (I put a glow on my name, see below), and we are done.
Supplies
Scrap Kit: By The Sea by KiKeKa Kits
HERE
Mask: WSL_84
HERE
3 Tubes by the same artist: I used tubes by Joel Adams which I purchased through CILM. You can get the tubes at CDO. Please don’t use these tubes without purchasing them. You must also get a license number from CDO.
HERE
Font: Kingthings Inkydink
HERE
Open a new canvas and go to Images, canvas resize 760 x 760. We will resize at the end.
Open cbg_bythesea_paper07. Resize by 99% to get to 100%. Copy & paste into your canvas. Open mask. Go to layers, new mask layer, from image. Merge group. I added a drop shadow of 1, 1, 50, 5.
Open cbg_bythesea_bubbles01. Copy & paste onto your canvas. Resize 50% then 80% all layers NOT checked. Place in upper right. Duplicate, mirror. Duplicate original again and rotate 45%. Merge all 3 bubble layers, add a drop shadow of 2, 2, 50, 5.
Open cbg_bythesea_frame02. Copy and paste onto your canvas. Rotate right 35%.
Open Use your magic and click inside both frame holes. Selections, modify, expand by 12. Keep repeating expand until you get the ants to cover all the inside of your frame. This will make it have the ants outside the frame itself in a few places. Open paper cbg_bythesea_paper02. Resize 99%, then 75% all layers checked. Copy & paste onto canvas and place under frame. Resize until you get the picture you want. Selections, invert, hit delete key on keyboard. Selections, select none.
Open cbg_bythesea_lighthouse. Copy and paste onto your canvas. Resize 80% and place to the right of frame.
Open the following elements and copy and paste them onto your canvas, one at a time. Resize each one to your liking and place where you want them.
Cbg_bythesea_scpoe
Cbg_bythesea_shell01
Cbg_bythesea_shell02
Cbg_bythesea_shell03
Cbg_bythesea_shell04
Cbg_bythesea_ball01
Cbg_bythesea_bird01
Cbg_bythesea_bird02 Mirror both birds
Give each of your elements and frame a drop shadow of 2, 2, 50, 5.
Open up cbg_bythesea_sand. Copy and paste sand onto your canvas 4 times. Rearrange sand to your liking. Merge all sand together and add drop shadow of 1, 1, 50, 5.
Open up tubes. Copy and place where you want them. Resize as needed. Place a drop shadow of 2, 2, 50, 5.
Mask and sand have a drop shadow of 1, 1, 50, 5. Everything else has a drop shadow of 2, 2, 50, 5.
Here I save it in psp form to move things if need be. Merge visible, resize 97% all layers NOT checked. Resize again down so your canvas is not larger than 525 x 525.
Add your copyright info, add name (I put a glow on my name, see below), and we are done.

 I hope you enjoyed my tut.
If you do any of my tuts please send to me at my email addy of glitterdeb75@yahoo.com and I will put them on my blog.
I hope you enjoyed my tut.
If you do any of my tuts please send to me at my email addy of glitterdeb75@yahoo.com and I will put them on my blog.
Wednesday, July 20, 2011
This tut is entirely my own creation. Any resemblance is purely coincidental. I will try to write this so that the beginner tagger can understand it.
 Supplies
Scrap Kit: Oh Lollipop by KiKeKa Kits
HERE
Tube: I am using one of PinUp Toons. You need a license to buy and use this tube. I bought mine at CILM, but you can get it at CDO
HERE
Template: CBN_Template17 by Deb
This blog site is closed, sorry. If you want the template just let me know.
Font: Tall Paul
HERE
Let’s Begin
Open template 17. Shift D to duplicate template. Close out original. On duplicate template delete copyright layer. Go to Image, canvas size 760 x760. I like to work on large canvases, we will resize at end.
Cbg_ohlollipop_paper10
Resize 22 % all layers checked.
Resize 75% all layers checked.
Adjust, hue and saturation
Hue: 225 Saturation: 197
Paper is now pink.
Raster 2: Selections, select all, float, defloat, copy and paste colorized paper. Selections, invert, hit delete key on keyboard. Select none.
Copy of vector 1. Selections, float, defloat, modify, expand by 4. New canvas, flood fill with color #e648b8. Copy and paste on template canvas. Selections, invert, hit delete key on keyboard. New canvas, flood fill with black.
Go to new pink circle, selections, float, defloat, modify, expand by 4. Copy and paste black onto template canvas. Selections, invert, hit delete key on keyboard. Select none.
Add drop shadow 5, 5, 50, 5.
Copy and paste tube onto template, place on top of pink circle. Resize 115%, adjust, sharpness, sharpen. Add drop shadow as listed above.
Cbg_lollipop_paper02
Resize 22% all layers checked.
Resize 75% all layers checked.
Adjust, hue and saturation
Hue: 129 Saturation: 197
Paper is now blue.
Do the following steps to raster 3, copy of raster 3 and copy 2 of raster 3.
Selections, float, defloat, copy and paste blue paper, selections, invert, hit delete key on keyboard, select none.
Go to the pink circle, selections, float, defloat, modify, expand by 4. Copy and paste black, invert, hit the delete key on keyboard. Select none. Move black circle below pink circle. Add drop shadow.
New canvas, flood fill with #19a9ad (blue).
Do the following steps to these layers, copy of vector 1, copy 2 of vector 1 and copy 3 of vector:
Selections, float, defloat, modify, expand by 4, copy and paste blue, invert, hit delete key on keyboard. Select none.
On each of the blue ring frames do the following: Selections, float, defloat, modify, expand by 4, copy and paste black, invert, hit delete key on keyboard. Move black circle below blue circles. Add drop shadow.
In each of the blue circles do the following: selections, float, defloat, tube positioned to your liking, invert, hit delete key on keyboard. Add drop shadow.
New canvas, flood fill with #da7673. Go to raster 5, selections, float, defloat, copy and paste coral color, selections, invert, hit delete key on keyboard.
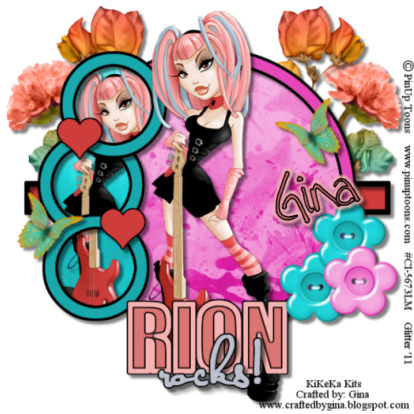
New canvas, flood fill with #cf9392. Go to new Rion layer, selections, float, defloat, modify, expand by 4, copy and paste light coral color, invert, hit delete key on keyboard. Selections, float, defloat, modify, expand by 2, copy and paste black, selections, invert, hit delete key on keyboard. Move black below light coral layer. Add drop shadow.
New canvas, flood fill with #bcc1cd. Go to raster 6 selections, float, defloat, modify, expand by 1. Copy and paste light blue, invert, hit delete key on keyboard. Add drop shadow. Stay on this layer, selections, float, defloat, modify, expand by 2, copy and paste black, invert, hit delete key on keyboard. Move black below light blue layer. Add drop shadow.
New canvas, flood fill with #ce3c3b. On both raster 4 and copy of raster 4 do the following: Selections, float, defloat, copy and paste red color, invert, hit delete key on keyboard. Stay on this layer, selections, float, defloat, modify, expand by 2, copy and paste black, invert, hit delete key on keyboard. Move black layer below red layer. Add drop shadow.
Go to raster 1 layer. Selections, float, defloat, copy and paste red, invert, hit delete key on keyboard. Go to copy of vector 1, selections, float, defloat, modify, expand by 2, copy and paste black, invert, hit delete key on keyboard. Add drop shadow.
Cbg_ohlolloipop_bougainville03
Resize 38% all layers checked.
Resize 50% all layers checked.
Copy and paste as new layer, bring to top of layers, move to the right upper corner, send to bottom, duplicate, mirror. Add drop shadow on both.
Cbg_lollipop_butterfly02
Resize 94% all layers checked.
Resize 50% all layers checked
Repeat resize 50%, resize 50% again.
Copy and paste as new layer, bring to the top, move to right of tag, duplicate, mirror, place both to your liking. Add drop shadow on both.
Cbg_lollipop_flower05
Resize 59% all layers checked.
Resize 50% all layers checked.
Copy and paste as new layer, bring to the top, move to the right and place to your liking. Duplicate, mirror, drop shadow both.
Cbg_lollipop_button03
Colorize blue as before
Resize 50% , then resize 75% all layers checked
Copy and paste as new layer, move to bottom right.
Duplicate, an place both to your liking.
Colorize button03 pink as before. Copy and paste as new layer, move on top of blue buttons. Add drop shadow to all three.
Add copyright and name.
Supplies
Scrap Kit: Oh Lollipop by KiKeKa Kits
HERE
Tube: I am using one of PinUp Toons. You need a license to buy and use this tube. I bought mine at CILM, but you can get it at CDO
HERE
Template: CBN_Template17 by Deb
This blog site is closed, sorry. If you want the template just let me know.
Font: Tall Paul
HERE
Let’s Begin
Open template 17. Shift D to duplicate template. Close out original. On duplicate template delete copyright layer. Go to Image, canvas size 760 x760. I like to work on large canvases, we will resize at end.
Cbg_ohlollipop_paper10
Resize 22 % all layers checked.
Resize 75% all layers checked.
Adjust, hue and saturation
Hue: 225 Saturation: 197
Paper is now pink.
Raster 2: Selections, select all, float, defloat, copy and paste colorized paper. Selections, invert, hit delete key on keyboard. Select none.
Copy of vector 1. Selections, float, defloat, modify, expand by 4. New canvas, flood fill with color #e648b8. Copy and paste on template canvas. Selections, invert, hit delete key on keyboard. New canvas, flood fill with black.
Go to new pink circle, selections, float, defloat, modify, expand by 4. Copy and paste black onto template canvas. Selections, invert, hit delete key on keyboard. Select none.
Add drop shadow 5, 5, 50, 5.
Copy and paste tube onto template, place on top of pink circle. Resize 115%, adjust, sharpness, sharpen. Add drop shadow as listed above.
Cbg_lollipop_paper02
Resize 22% all layers checked.
Resize 75% all layers checked.
Adjust, hue and saturation
Hue: 129 Saturation: 197
Paper is now blue.
Do the following steps to raster 3, copy of raster 3 and copy 2 of raster 3.
Selections, float, defloat, copy and paste blue paper, selections, invert, hit delete key on keyboard, select none.
Go to the pink circle, selections, float, defloat, modify, expand by 4. Copy and paste black, invert, hit the delete key on keyboard. Select none. Move black circle below pink circle. Add drop shadow.
New canvas, flood fill with #19a9ad (blue).
Do the following steps to these layers, copy of vector 1, copy 2 of vector 1 and copy 3 of vector:
Selections, float, defloat, modify, expand by 4, copy and paste blue, invert, hit delete key on keyboard. Select none.
On each of the blue ring frames do the following: Selections, float, defloat, modify, expand by 4, copy and paste black, invert, hit delete key on keyboard. Move black circle below blue circles. Add drop shadow.
In each of the blue circles do the following: selections, float, defloat, tube positioned to your liking, invert, hit delete key on keyboard. Add drop shadow.
New canvas, flood fill with #da7673. Go to raster 5, selections, float, defloat, copy and paste coral color, selections, invert, hit delete key on keyboard.
New canvas, flood fill with #cf9392. Go to new Rion layer, selections, float, defloat, modify, expand by 4, copy and paste light coral color, invert, hit delete key on keyboard. Selections, float, defloat, modify, expand by 2, copy and paste black, selections, invert, hit delete key on keyboard. Move black below light coral layer. Add drop shadow.
New canvas, flood fill with #bcc1cd. Go to raster 6 selections, float, defloat, modify, expand by 1. Copy and paste light blue, invert, hit delete key on keyboard. Add drop shadow. Stay on this layer, selections, float, defloat, modify, expand by 2, copy and paste black, invert, hit delete key on keyboard. Move black below light blue layer. Add drop shadow.
New canvas, flood fill with #ce3c3b. On both raster 4 and copy of raster 4 do the following: Selections, float, defloat, copy and paste red color, invert, hit delete key on keyboard. Stay on this layer, selections, float, defloat, modify, expand by 2, copy and paste black, invert, hit delete key on keyboard. Move black layer below red layer. Add drop shadow.
Go to raster 1 layer. Selections, float, defloat, copy and paste red, invert, hit delete key on keyboard. Go to copy of vector 1, selections, float, defloat, modify, expand by 2, copy and paste black, invert, hit delete key on keyboard. Add drop shadow.
Cbg_ohlolloipop_bougainville03
Resize 38% all layers checked.
Resize 50% all layers checked.
Copy and paste as new layer, bring to top of layers, move to the right upper corner, send to bottom, duplicate, mirror. Add drop shadow on both.
Cbg_lollipop_butterfly02
Resize 94% all layers checked.
Resize 50% all layers checked
Repeat resize 50%, resize 50% again.
Copy and paste as new layer, bring to the top, move to right of tag, duplicate, mirror, place both to your liking. Add drop shadow on both.
Cbg_lollipop_flower05
Resize 59% all layers checked.
Resize 50% all layers checked.
Copy and paste as new layer, bring to the top, move to the right and place to your liking. Duplicate, mirror, drop shadow both.
Cbg_lollipop_button03
Colorize blue as before
Resize 50% , then resize 75% all layers checked
Copy and paste as new layer, move to bottom right.
Duplicate, an place both to your liking.
Colorize button03 pink as before. Copy and paste as new layer, move on top of blue buttons. Add drop shadow to all three.
Add copyright and name.
 That’s it. Hope you enjoy my tut.
 Supplies
Scrap Kit: Oh Lollipop by KiKeKa Kits
HERE
Tube: I am using one of PinUp Toons. You need a license to buy and use this tube. I bought mine at CILM, but you can get it at CDO
HERE
Template: CBN_Template17 by Deb
This blog site is closed, sorry. If you want the template just let me know.
Font: Tall Paul
HERE
Let’s Begin
Open template 17. Shift D to duplicate template. Close out original. On duplicate template delete copyright layer. Go to Image, canvas size 760 x760. I like to work on large canvases, we will resize at end.
Cbg_ohlollipop_paper10
Resize 22 % all layers checked.
Resize 75% all layers checked.
Adjust, hue and saturation
Hue: 225 Saturation: 197
Paper is now pink.
Raster 2: Selections, select all, float, defloat, copy and paste colorized paper. Selections, invert, hit delete key on keyboard. Select none.
Copy of vector 1. Selections, float, defloat, modify, expand by 4. New canvas, flood fill with color #e648b8. Copy and paste on template canvas. Selections, invert, hit delete key on keyboard. New canvas, flood fill with black.
Go to new pink circle, selections, float, defloat, modify, expand by 4. Copy and paste black onto template canvas. Selections, invert, hit delete key on keyboard. Select none.
Add drop shadow 5, 5, 50, 5.
Copy and paste tube onto template, place on top of pink circle. Resize 115%, adjust, sharpness, sharpen. Add drop shadow as listed above.
Cbg_lollipop_paper02
Resize 22% all layers checked.
Resize 75% all layers checked.
Adjust, hue and saturation
Hue: 129 Saturation: 197
Paper is now blue.
Do the following steps to raster 3, copy of raster 3 and copy 2 of raster 3.
Selections, float, defloat, copy and paste blue paper, selections, invert, hit delete key on keyboard, select none.
Go to the pink circle, selections, float, defloat, modify, expand by 4. Copy and paste black, invert, hit the delete key on keyboard. Select none. Move black circle below pink circle. Add drop shadow.
New canvas, flood fill with #19a9ad (blue).
Do the following steps to these layers, copy of vector 1, copy 2 of vector 1 and copy 3 of vector:
Selections, float, defloat, modify, expand by 4, copy and paste blue, invert, hit delete key on keyboard. Select none.
On each of the blue ring frames do the following: Selections, float, defloat, modify, expand by 4, copy and paste black, invert, hit delete key on keyboard. Move black circle below blue circles. Add drop shadow.
In each of the blue circles do the following: selections, float, defloat, tube positioned to your liking, invert, hit delete key on keyboard. Add drop shadow.
New canvas, flood fill with #da7673. Go to raster 5, selections, float, defloat, copy and paste coral color, selections, invert, hit delete key on keyboard.
New canvas, flood fill with #cf9392. Go to new Rion layer, selections, float, defloat, modify, expand by 4, copy and paste light coral color, invert, hit delete key on keyboard. Selections, float, defloat, modify, expand by 2, copy and paste black, selections, invert, hit delete key on keyboard. Move black below light coral layer. Add drop shadow.
New canvas, flood fill with #bcc1cd. Go to raster 6 selections, float, defloat, modify, expand by 1. Copy and paste light blue, invert, hit delete key on keyboard. Add drop shadow. Stay on this layer, selections, float, defloat, modify, expand by 2, copy and paste black, invert, hit delete key on keyboard. Move black below light blue layer. Add drop shadow.
New canvas, flood fill with #ce3c3b. On both raster 4 and copy of raster 4 do the following: Selections, float, defloat, copy and paste red color, invert, hit delete key on keyboard. Stay on this layer, selections, float, defloat, modify, expand by 2, copy and paste black, invert, hit delete key on keyboard. Move black layer below red layer. Add drop shadow.
Go to raster 1 layer. Selections, float, defloat, copy and paste red, invert, hit delete key on keyboard. Go to copy of vector 1, selections, float, defloat, modify, expand by 2, copy and paste black, invert, hit delete key on keyboard. Add drop shadow.
Cbg_ohlolloipop_bougainville03
Resize 38% all layers checked.
Resize 50% all layers checked.
Copy and paste as new layer, bring to top of layers, move to the right upper corner, send to bottom, duplicate, mirror. Add drop shadow on both.
Cbg_lollipop_butterfly02
Resize 94% all layers checked.
Resize 50% all layers checked
Repeat resize 50%, resize 50% again.
Copy and paste as new layer, bring to the top, move to right of tag, duplicate, mirror, place both to your liking. Add drop shadow on both.
Cbg_lollipop_flower05
Resize 59% all layers checked.
Resize 50% all layers checked.
Copy and paste as new layer, bring to the top, move to the right and place to your liking. Duplicate, mirror, drop shadow both.
Cbg_lollipop_button03
Colorize blue as before
Resize 50% , then resize 75% all layers checked
Copy and paste as new layer, move to bottom right.
Duplicate, an place both to your liking.
Colorize button03 pink as before. Copy and paste as new layer, move on top of blue buttons. Add drop shadow to all three.
Add copyright and name.
Supplies
Scrap Kit: Oh Lollipop by KiKeKa Kits
HERE
Tube: I am using one of PinUp Toons. You need a license to buy and use this tube. I bought mine at CILM, but you can get it at CDO
HERE
Template: CBN_Template17 by Deb
This blog site is closed, sorry. If you want the template just let me know.
Font: Tall Paul
HERE
Let’s Begin
Open template 17. Shift D to duplicate template. Close out original. On duplicate template delete copyright layer. Go to Image, canvas size 760 x760. I like to work on large canvases, we will resize at end.
Cbg_ohlollipop_paper10
Resize 22 % all layers checked.
Resize 75% all layers checked.
Adjust, hue and saturation
Hue: 225 Saturation: 197
Paper is now pink.
Raster 2: Selections, select all, float, defloat, copy and paste colorized paper. Selections, invert, hit delete key on keyboard. Select none.
Copy of vector 1. Selections, float, defloat, modify, expand by 4. New canvas, flood fill with color #e648b8. Copy and paste on template canvas. Selections, invert, hit delete key on keyboard. New canvas, flood fill with black.
Go to new pink circle, selections, float, defloat, modify, expand by 4. Copy and paste black onto template canvas. Selections, invert, hit delete key on keyboard. Select none.
Add drop shadow 5, 5, 50, 5.
Copy and paste tube onto template, place on top of pink circle. Resize 115%, adjust, sharpness, sharpen. Add drop shadow as listed above.
Cbg_lollipop_paper02
Resize 22% all layers checked.
Resize 75% all layers checked.
Adjust, hue and saturation
Hue: 129 Saturation: 197
Paper is now blue.
Do the following steps to raster 3, copy of raster 3 and copy 2 of raster 3.
Selections, float, defloat, copy and paste blue paper, selections, invert, hit delete key on keyboard, select none.
Go to the pink circle, selections, float, defloat, modify, expand by 4. Copy and paste black, invert, hit the delete key on keyboard. Select none. Move black circle below pink circle. Add drop shadow.
New canvas, flood fill with #19a9ad (blue).
Do the following steps to these layers, copy of vector 1, copy 2 of vector 1 and copy 3 of vector:
Selections, float, defloat, modify, expand by 4, copy and paste blue, invert, hit delete key on keyboard. Select none.
On each of the blue ring frames do the following: Selections, float, defloat, modify, expand by 4, copy and paste black, invert, hit delete key on keyboard. Move black circle below blue circles. Add drop shadow.
In each of the blue circles do the following: selections, float, defloat, tube positioned to your liking, invert, hit delete key on keyboard. Add drop shadow.
New canvas, flood fill with #da7673. Go to raster 5, selections, float, defloat, copy and paste coral color, selections, invert, hit delete key on keyboard.
New canvas, flood fill with #cf9392. Go to new Rion layer, selections, float, defloat, modify, expand by 4, copy and paste light coral color, invert, hit delete key on keyboard. Selections, float, defloat, modify, expand by 2, copy and paste black, selections, invert, hit delete key on keyboard. Move black below light coral layer. Add drop shadow.
New canvas, flood fill with #bcc1cd. Go to raster 6 selections, float, defloat, modify, expand by 1. Copy and paste light blue, invert, hit delete key on keyboard. Add drop shadow. Stay on this layer, selections, float, defloat, modify, expand by 2, copy and paste black, invert, hit delete key on keyboard. Move black below light blue layer. Add drop shadow.
New canvas, flood fill with #ce3c3b. On both raster 4 and copy of raster 4 do the following: Selections, float, defloat, copy and paste red color, invert, hit delete key on keyboard. Stay on this layer, selections, float, defloat, modify, expand by 2, copy and paste black, invert, hit delete key on keyboard. Move black layer below red layer. Add drop shadow.
Go to raster 1 layer. Selections, float, defloat, copy and paste red, invert, hit delete key on keyboard. Go to copy of vector 1, selections, float, defloat, modify, expand by 2, copy and paste black, invert, hit delete key on keyboard. Add drop shadow.
Cbg_ohlolloipop_bougainville03
Resize 38% all layers checked.
Resize 50% all layers checked.
Copy and paste as new layer, bring to top of layers, move to the right upper corner, send to bottom, duplicate, mirror. Add drop shadow on both.
Cbg_lollipop_butterfly02
Resize 94% all layers checked.
Resize 50% all layers checked
Repeat resize 50%, resize 50% again.
Copy and paste as new layer, bring to the top, move to right of tag, duplicate, mirror, place both to your liking. Add drop shadow on both.
Cbg_lollipop_flower05
Resize 59% all layers checked.
Resize 50% all layers checked.
Copy and paste as new layer, bring to the top, move to the right and place to your liking. Duplicate, mirror, drop shadow both.
Cbg_lollipop_button03
Colorize blue as before
Resize 50% , then resize 75% all layers checked
Copy and paste as new layer, move to bottom right.
Duplicate, an place both to your liking.
Colorize button03 pink as before. Copy and paste as new layer, move on top of blue buttons. Add drop shadow to all three.
Add copyright and name.
 That’s it. Hope you enjoy my tut.
Tuesday, July 19, 2011
 This is entirely my creation. Any resemblances are purely coincidental. I have tried to write this in simple steps so even the beginner can understand it. Supplies Scrap kit: Lollipop by KiKeKa Kits HERE Tube: I am using one from Joel Adams, a personal commission. Any tube will work. Font: Walt Disney Script Mask: WSL_84 by Weescotlass HERE Let’s begin Open a new canvas 600 x 600 Cbg_lollipop_paper13 Resize 22% resize all layers checked Copy and paste as new layer Open mask 84 Layers, new mask layer, from image Merge group. Apply a drop shadow of 1, 1, 50, 5. Open cbg_lollipop_spots02 Resize 33% all layers checked Resize 50% all layers checked Copy and paste on to top of mask layer. Position to the right top Duplicate layer, mirror. Merge down. Duplicate this layer. Flip and mirror. Merge down. Apply drop shadow of 5, 5, 50, 5 Open cbg_lollipop_frame01 Resize 38% all layers checked Resize 50% all layers checked Copy and paste on top of spots. Use magic wand inside frame. Selections, modify, expand by 8. Open cgb_lollipop_paper14. Resize 22% all layers checked. Resize 50% all layers checked. Copy and paste as new layer. Position below frame and arrange to your liking. Selections, invert, hit delete key on keyboard. DO NOT DESELECT. Here you place the tube of your choice and place under frame. Duplicate tube and place on top of frame. Close the eye on the layers palette on the right of psp. Go back to original tube layer and hit delete key on keyboard. Go to copy of tube and add a drop shadow of your choice. I used 5, 5, 50, 5 on all items from here on out. Use eraser to erase all the unwanted parts of the tube. The following elements can be placed around frame as you like. This is only a guide, I will tell you how I resized them all. Apply drop shadow to all. Cbg_lollipop_girl02 Copy and paste as new layer. Resize by 50%, then by 75% All layers NOT checked. Rotate 20 degrees to the left. Cbg_lollipop_lollipop04 Resize 72% all layers checked. Copy and paste as new layer. Resize 50% all layers NOT checked Repeat resize 50%, then resize 75% All layers NOT checked. Cbg_lollipop_02 Resize 64% all layers checked. Copy and paste as new layer. Resize 50% all layers NOT checked. Repeat resize 50%, then resize 75%. Rotate left 15 degrees. Cbg_lollipop_lollipop06 Resize 66% all layers checked. Copy and paste as new layer. Resize 50% all layers NOT checked. Repeat resize 50% then resize 75%. Rotate to the right 15 degrees. Cbg_lollipop_icecream02 Copy and paste as new layer. Resize 50%, repeat resize 50%, Then resize 80%. Duplicate, mirror. Cbg_lollipop_icecream Copy and paste as new layer. Resize 50%, repeat resize 50%. Cbg_lollipop_flower02 Resize 91%, all layers checked. Resize 50%, repeat resize 50%. Copy and paste as new layer. Resize 50% all layers NOT checked. Resize 75%. Duplicate, flip. Cbg_lollipop_flower04 Resize 96% all layers checked. Resize 50%, repeat resize 50%. Copy and paste as new layer. Resize 50% all layers NOT checked. Resize 75%. Cbg_lollipop_dragonfly02 Resize 76% all layers checked. Resize 50%, repeat resize 50%. Copy and paste as new layer. Resize 50% all layers NOT checked. Resize 75%. Cbg_lollipop_candy04 Resize 44% all layers checked. Resize 50%, repeat resize 50%. Copy and paste as new layer. Resize 50% all layers NOT checked. Resize 95%. Cbg_lollipop_brad02 Resize 50% all layers checked. Repeat resize 50%. Copy and paste as new layer. Resize 50% all layers NOT checked. Resize 50% Cbg_lollipop_brad04 Resize 50% all layers checked. Repeat resize 50%. Copy and paste as new layer. Resize 50% all layers NOT checked. Resize 75%. Cbg_lollipop_balloons Resize 40% all layers checked. Resize 50%, repeat resize 50%. Copy and paste as new layer. Resize 75% all layers NOT checked. Merge visible. Add your copyright. Save in png or jpeg format, whichever you prefer. Add your name. I added a glow to my name 7 medium. That’s it. Simple.
  I hope that you enjoy my tut as much as I did writing it.
Thursday, June 23, 2011
It has been awhile since I have posted so I need to update you all. My arm is still not mended all the way. The last time I saw the orthopedic doctor he said that the break still has some mending to go. I have a 3 pound weight limit. There isn't much that I can pick up with that limit. I try to do as much as I can with it and sometimes I forget and try to do things that I shouldn't. It is still pretty painful, the pain meds take the edge off but it never totally goes away. The thing that has me worried is my wrist and hand. My wrist won't pull up like it is supposed to, it just hangs there, like a limp rag. Very frustrating. I can only turn my hand over about half way, and my fingers don't work either. This is all due to the radial nerve being pinched for 2 days. Dr. Bohlen says that if my hand doesn't start working on its own by August he will send me to a nerve specialist in Lincoln or Omaha. I hope that it starts working soon.
Tuesday, March 29, 2011
 Hop Into Spring
This is a simple and fun tut.
I used the awesome artwork of Joel Adams in my first example, which you can get at Creative Design Outlet.
In my second example at the bottom I used the fabulous artwork of Keith Garvey which you can get at PSP Tubes Emporium.
Please use these tubes with the proper licenses.
The scrap kit I used is Hop Into Spring by Bratty at Pure Purrfection Creators Corner.
The font I used is Springtime Flourish.
Open the fence from the kit. Shift D to duplicate it. Close out the original. Resize by 97% so the fence is at 100%. Move down slightly.
Open paper 1. C & P (copy & paste) behind fence. Put the grass part down below the fence a little bit.
C & P tube of choice and resize 85%. Position to the right side, making sure you stay on the paper.
C & P Bunny, mirror and duplicate. Resize 1 bunny 55% and 1 bunny 45%. Position to the left side of tag.
C & P Bird, resizing 35%. Position on top of fence.
C & P Music Notes, resizing 15%. Duplicate twice and position up by bird.
Type Hop into Spring and position to your liking. I used color 62942e and added a glow with f2c780 with a medium band. Chart below.
Hop Into Spring
This is a simple and fun tut.
I used the awesome artwork of Joel Adams in my first example, which you can get at Creative Design Outlet.
In my second example at the bottom I used the fabulous artwork of Keith Garvey which you can get at PSP Tubes Emporium.
Please use these tubes with the proper licenses.
The scrap kit I used is Hop Into Spring by Bratty at Pure Purrfection Creators Corner.
The font I used is Springtime Flourish.
Open the fence from the kit. Shift D to duplicate it. Close out the original. Resize by 97% so the fence is at 100%. Move down slightly.
Open paper 1. C & P (copy & paste) behind fence. Put the grass part down below the fence a little bit.
C & P tube of choice and resize 85%. Position to the right side, making sure you stay on the paper.
C & P Bunny, mirror and duplicate. Resize 1 bunny 55% and 1 bunny 45%. Position to the left side of tag.
C & P Bird, resizing 35%. Position on top of fence.
C & P Music Notes, resizing 15%. Duplicate twice and position up by bird.
Type Hop into Spring and position to your liking. I used color 62942e and added a glow with f2c780 with a medium band. Chart below.
 Drop shadow all layers except for the paper layer. Merge visible, copy and paste as new image. Resize to your liking. Add copyright info.

Thursday, March 17, 2011
It has been awhile since I posted so I will update things now.
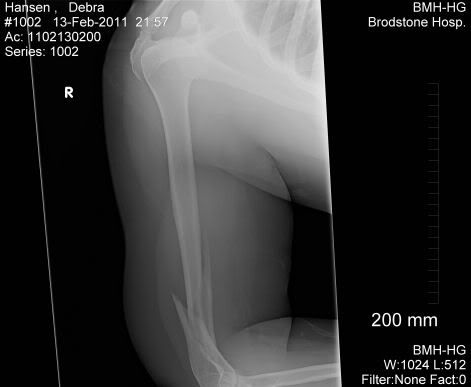
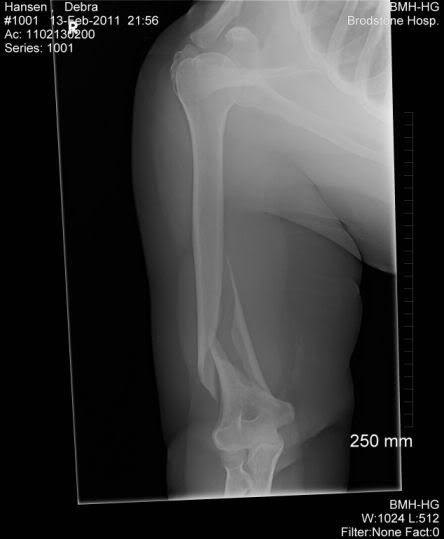
On Feburary 13 I fell and broke my right arm severly. When I do things I tend to do them in a big way and this was no different. Pictures posted below. I spent Sunday night in our hometown hospital and moved to another hospital 58 miles away the next day by ambulance. Every bump and dip in the road brought severe pain. I was given morphine several times during transport. I was supposed to have surgery that afternoon, but had to wait until Tuesday afternoon, because they had to order a part for my arm. I felt like a car ordering a part a part and waiting on it to come in. The surgery went well, they had to take apart my elbow to put a metal plate and a metal rod in, then they put my elbow back together. The rod goes from my elbow to my shoulder. I need to get pictures of the metal parts, will try to remember it next time I see the doctor. I was then released on Thursday. I spent more time in the hospital for my broken arm then I did for my double mastectomy. It has been a month since I fell. The break area just has twinges every now and then, not too bad. My hand is another story. I damaged my radial nerve. It was pinched off for 2 days while waiting for surgery. My hand is still very swollen and the tight skin is very painful. At first I had no feeling in the skin but that has returned. But I have very limited movement in my fingers. I can move them backwards, but can't make a fist. I can move my thumb a little bit. I can't move my wrist at all. And I have no surface feeling in my forearm up to the elbow. I don't know if I can move my elbow yet or not, but I will find out tomorrow (March 17th). They are taking the splint cast off and putting on a brace. This will still give me protection in the break area while allowing my elbow to move. I will probably start therapy after getting the brace. I am right-handed and an avid crafter, so the way my arm is now is really worring me. I hope that eventually I will get full use of my hand and be able to work with my plastic canvas and rubber stamps again. Please keep me in your prayers and your fingers crossed. Thanks.


Tuesday, January 25, 2011
Love And Desire
 This tutorial is entirely my idea. Any similarities are purely coincidental. Hope that you enjoy working this tut as much as I did making it.
Supplies:
Love n Desire Scrap kit by Cowgirl Creations and can be found
HERE:
Tube is by Barbara Jensen and can be found
HERE:
Mask is by WeeScottLass170 and can be found
HERE:
Open Mask in PSP
Outside Filters:
MuRa’s Meister Copies
Xero Porcelain
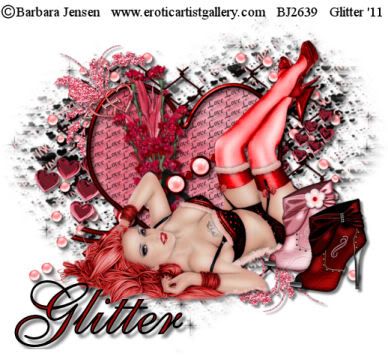
I chose the red elements on Barb’s tube and colorized the following piece:
Stockings Silver Blue to 255, 255
Drop Shadow used throughout 5, 5, 50, 5 Black
Canvas size: 750 x 700
I start out large for plenty of room to put things, then I size down at the end.
Ok, let’s start.
1) Paper XCCLD3. Copy and paste into your canvas. Resize to 150% to cover all the canvas. Layers, New Mask Layer, From Image. Merge group. Resize 110%. Drop shadow.
2) CCLD Chain Link. Copy and paste on top of mask. Resize 110%. Colorize 255, 255. Drop shadow.
3) CCLD Pearl Scatters. Copy and paste on top of chain link, move to the left. Colorize 255, 255. Duplicate, mirror. Merge both, drop shadow.
4) CCLD Glitter Doodle 1. Copy and paste on top of pearls. Resize 70%. Move to top left corner. Duplicate, mirror, flip. Merge both, drop shadow.
5) CCLD Heart Trail. Copy and paste on top of glitter doodle layer. Resize 110%. Drop shadow.
6) CCLD Chrome Heart. Copy and paste on top of heart trail. Use magic wand, make sure all spaces are clicked. Selections, modify expand by 5.
7) XCCLD Paper 5. Copy and paste on top of chrome heart. Selections, invert, delete, move below chrome heart. DO NOT DESELECT.
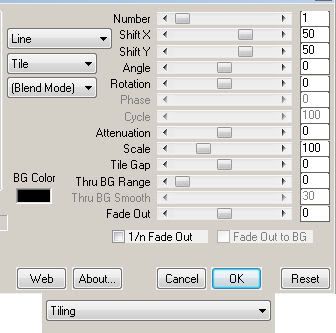
8) Using font of choice, I used Cantilope size 14 stroke 0 color black. Type out word Love, or word of choice. MuRa’s Meister copies with the following settings:
This tutorial is entirely my idea. Any similarities are purely coincidental. Hope that you enjoy working this tut as much as I did making it.
Supplies:
Love n Desire Scrap kit by Cowgirl Creations and can be found
HERE:
Tube is by Barbara Jensen and can be found
HERE:
Mask is by WeeScottLass170 and can be found
HERE:
Open Mask in PSP
Outside Filters:
MuRa’s Meister Copies
Xero Porcelain
I chose the red elements on Barb’s tube and colorized the following piece:
Stockings Silver Blue to 255, 255
Drop Shadow used throughout 5, 5, 50, 5 Black
Canvas size: 750 x 700
I start out large for plenty of room to put things, then I size down at the end.
Ok, let’s start.
1) Paper XCCLD3. Copy and paste into your canvas. Resize to 150% to cover all the canvas. Layers, New Mask Layer, From Image. Merge group. Resize 110%. Drop shadow.
2) CCLD Chain Link. Copy and paste on top of mask. Resize 110%. Colorize 255, 255. Drop shadow.
3) CCLD Pearl Scatters. Copy and paste on top of chain link, move to the left. Colorize 255, 255. Duplicate, mirror. Merge both, drop shadow.
4) CCLD Glitter Doodle 1. Copy and paste on top of pearls. Resize 70%. Move to top left corner. Duplicate, mirror, flip. Merge both, drop shadow.
5) CCLD Heart Trail. Copy and paste on top of glitter doodle layer. Resize 110%. Drop shadow.
6) CCLD Chrome Heart. Copy and paste on top of heart trail. Use magic wand, make sure all spaces are clicked. Selections, modify expand by 5.
7) XCCLD Paper 5. Copy and paste on top of chrome heart. Selections, invert, delete, move below chrome heart. DO NOT DESELECT.
8) Using font of choice, I used Cantilope size 14 stroke 0 color black. Type out word Love, or word of choice. MuRa’s Meister copies with the following settings:
 9) SSLD Blossum Stick. Resize 70%. Duplicate, mirror, rotate duplicate left 15. Merge both.
10) CCLD Flower Plant 4. Resize 70%. Merge with blossum stick layer. Put this below Chrome heart layer. Duplicate, put duplicate above heart layer and erase parts over the middle bar of chrome heart. Drop shadow both layers.
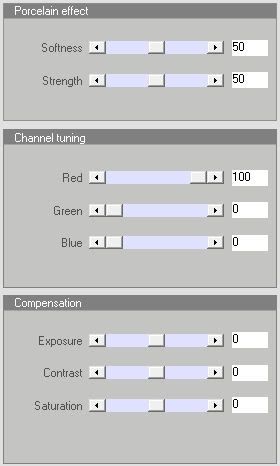
11) Copy and paste Barb’s tube. Apply Xero porcelain with these settings:
9) SSLD Blossum Stick. Resize 70%. Duplicate, mirror, rotate duplicate left 15. Merge both.
10) CCLD Flower Plant 4. Resize 70%. Merge with blossum stick layer. Put this below Chrome heart layer. Duplicate, put duplicate above heart layer and erase parts over the middle bar of chrome heart. Drop shadow both layers.
11) Copy and paste Barb’s tube. Apply Xero porcelain with these settings:
 12) CCLD Boot 1 and CCLD Boot 2. Resize both boots 70%, mirror, put in lower right hand corner stacking them on top of each other and offset them.
13) Resize tag to you liking. This is what I do. I save tag in psp format first. Then I merge visible, copy and paste as new image. Resize tag 97%, all layers NOT checked. Resize tag 70%, all layers ARE checked. Add credit info.
14) Apply name or saying that you wish. Save in either png format or jpg format.
We are finished. Thanks for looking at my tut. I would love to see your results. You can send them to me at glitterdeb75@yahoo.com I will put them here on my blog to display them.
12) CCLD Boot 1 and CCLD Boot 2. Resize both boots 70%, mirror, put in lower right hand corner stacking them on top of each other and offset them.
13) Resize tag to you liking. This is what I do. I save tag in psp format first. Then I merge visible, copy and paste as new image. Resize tag 97%, all layers NOT checked. Resize tag 70%, all layers ARE checked. Add credit info.
14) Apply name or saying that you wish. Save in either png format or jpg format.
We are finished. Thanks for looking at my tut. I would love to see your results. You can send them to me at glitterdeb75@yahoo.com I will put them here on my blog to display them.
 This tutorial is entirely my idea. Any similarities are purely coincidental. Hope that you enjoy working this tut as much as I did making it.
Supplies:
Love n Desire Scrap kit by Cowgirl Creations and can be found
HERE:
Tube is by Barbara Jensen and can be found
HERE:
Mask is by WeeScottLass170 and can be found
HERE:
Open Mask in PSP
Outside Filters:
MuRa’s Meister Copies
Xero Porcelain
I chose the red elements on Barb’s tube and colorized the following piece:
Stockings Silver Blue to 255, 255
Drop Shadow used throughout 5, 5, 50, 5 Black
Canvas size: 750 x 700
I start out large for plenty of room to put things, then I size down at the end.
Ok, let’s start.
1) Paper XCCLD3. Copy and paste into your canvas. Resize to 150% to cover all the canvas. Layers, New Mask Layer, From Image. Merge group. Resize 110%. Drop shadow.
2) CCLD Chain Link. Copy and paste on top of mask. Resize 110%. Colorize 255, 255. Drop shadow.
3) CCLD Pearl Scatters. Copy and paste on top of chain link, move to the left. Colorize 255, 255. Duplicate, mirror. Merge both, drop shadow.
4) CCLD Glitter Doodle 1. Copy and paste on top of pearls. Resize 70%. Move to top left corner. Duplicate, mirror, flip. Merge both, drop shadow.
5) CCLD Heart Trail. Copy and paste on top of glitter doodle layer. Resize 110%. Drop shadow.
6) CCLD Chrome Heart. Copy and paste on top of heart trail. Use magic wand, make sure all spaces are clicked. Selections, modify expand by 5.
7) XCCLD Paper 5. Copy and paste on top of chrome heart. Selections, invert, delete, move below chrome heart. DO NOT DESELECT.
8) Using font of choice, I used Cantilope size 14 stroke 0 color black. Type out word Love, or word of choice. MuRa’s Meister copies with the following settings:
This tutorial is entirely my idea. Any similarities are purely coincidental. Hope that you enjoy working this tut as much as I did making it.
Supplies:
Love n Desire Scrap kit by Cowgirl Creations and can be found
HERE:
Tube is by Barbara Jensen and can be found
HERE:
Mask is by WeeScottLass170 and can be found
HERE:
Open Mask in PSP
Outside Filters:
MuRa’s Meister Copies
Xero Porcelain
I chose the red elements on Barb’s tube and colorized the following piece:
Stockings Silver Blue to 255, 255
Drop Shadow used throughout 5, 5, 50, 5 Black
Canvas size: 750 x 700
I start out large for plenty of room to put things, then I size down at the end.
Ok, let’s start.
1) Paper XCCLD3. Copy and paste into your canvas. Resize to 150% to cover all the canvas. Layers, New Mask Layer, From Image. Merge group. Resize 110%. Drop shadow.
2) CCLD Chain Link. Copy and paste on top of mask. Resize 110%. Colorize 255, 255. Drop shadow.
3) CCLD Pearl Scatters. Copy and paste on top of chain link, move to the left. Colorize 255, 255. Duplicate, mirror. Merge both, drop shadow.
4) CCLD Glitter Doodle 1. Copy and paste on top of pearls. Resize 70%. Move to top left corner. Duplicate, mirror, flip. Merge both, drop shadow.
5) CCLD Heart Trail. Copy and paste on top of glitter doodle layer. Resize 110%. Drop shadow.
6) CCLD Chrome Heart. Copy and paste on top of heart trail. Use magic wand, make sure all spaces are clicked. Selections, modify expand by 5.
7) XCCLD Paper 5. Copy and paste on top of chrome heart. Selections, invert, delete, move below chrome heart. DO NOT DESELECT.
8) Using font of choice, I used Cantilope size 14 stroke 0 color black. Type out word Love, or word of choice. MuRa’s Meister copies with the following settings:
 9) SSLD Blossum Stick. Resize 70%. Duplicate, mirror, rotate duplicate left 15. Merge both.
10) CCLD Flower Plant 4. Resize 70%. Merge with blossum stick layer. Put this below Chrome heart layer. Duplicate, put duplicate above heart layer and erase parts over the middle bar of chrome heart. Drop shadow both layers.
11) Copy and paste Barb’s tube. Apply Xero porcelain with these settings:
9) SSLD Blossum Stick. Resize 70%. Duplicate, mirror, rotate duplicate left 15. Merge both.
10) CCLD Flower Plant 4. Resize 70%. Merge with blossum stick layer. Put this below Chrome heart layer. Duplicate, put duplicate above heart layer and erase parts over the middle bar of chrome heart. Drop shadow both layers.
11) Copy and paste Barb’s tube. Apply Xero porcelain with these settings:
 12) CCLD Boot 1 and CCLD Boot 2. Resize both boots 70%, mirror, put in lower right hand corner stacking them on top of each other and offset them.
13) Resize tag to you liking. This is what I do. I save tag in psp format first. Then I merge visible, copy and paste as new image. Resize tag 97%, all layers NOT checked. Resize tag 70%, all layers ARE checked. Add credit info.
14) Apply name or saying that you wish. Save in either png format or jpg format.
We are finished. Thanks for looking at my tut. I would love to see your results. You can send them to me at glitterdeb75@yahoo.com I will put them here on my blog to display them.
12) CCLD Boot 1 and CCLD Boot 2. Resize both boots 70%, mirror, put in lower right hand corner stacking them on top of each other and offset them.
13) Resize tag to you liking. This is what I do. I save tag in psp format first. Then I merge visible, copy and paste as new image. Resize tag 97%, all layers NOT checked. Resize tag 70%, all layers ARE checked. Add credit info.
14) Apply name or saying that you wish. Save in either png format or jpg format.
We are finished. Thanks for looking at my tut. I would love to see your results. You can send them to me at glitterdeb75@yahoo.com I will put them here on my blog to display them.
Subscribe to:
Posts
(Atom)