Blinkies


Wednesday, July 20, 2011
This tut is entirely my own creation. Any resemblance is purely coincidental. I will try to write this so that the beginner tagger can understand it.
 Supplies
Scrap Kit: Oh Lollipop by KiKeKa Kits
HERE
Tube: I am using one of PinUp Toons. You need a license to buy and use this tube. I bought mine at CILM, but you can get it at CDO
HERE
Template: CBN_Template17 by Deb
This blog site is closed, sorry. If you want the template just let me know.
Font: Tall Paul
HERE
Let’s Begin
Open template 17. Shift D to duplicate template. Close out original. On duplicate template delete copyright layer. Go to Image, canvas size 760 x760. I like to work on large canvases, we will resize at end.
Cbg_ohlollipop_paper10
Resize 22 % all layers checked.
Resize 75% all layers checked.
Adjust, hue and saturation
Hue: 225 Saturation: 197
Paper is now pink.
Raster 2: Selections, select all, float, defloat, copy and paste colorized paper. Selections, invert, hit delete key on keyboard. Select none.
Copy of vector 1. Selections, float, defloat, modify, expand by 4. New canvas, flood fill with color #e648b8. Copy and paste on template canvas. Selections, invert, hit delete key on keyboard. New canvas, flood fill with black.
Go to new pink circle, selections, float, defloat, modify, expand by 4. Copy and paste black onto template canvas. Selections, invert, hit delete key on keyboard. Select none.
Add drop shadow 5, 5, 50, 5.
Copy and paste tube onto template, place on top of pink circle. Resize 115%, adjust, sharpness, sharpen. Add drop shadow as listed above.
Cbg_lollipop_paper02
Resize 22% all layers checked.
Resize 75% all layers checked.
Adjust, hue and saturation
Hue: 129 Saturation: 197
Paper is now blue.
Do the following steps to raster 3, copy of raster 3 and copy 2 of raster 3.
Selections, float, defloat, copy and paste blue paper, selections, invert, hit delete key on keyboard, select none.
Go to the pink circle, selections, float, defloat, modify, expand by 4. Copy and paste black, invert, hit the delete key on keyboard. Select none. Move black circle below pink circle. Add drop shadow.
New canvas, flood fill with #19a9ad (blue).
Do the following steps to these layers, copy of vector 1, copy 2 of vector 1 and copy 3 of vector:
Selections, float, defloat, modify, expand by 4, copy and paste blue, invert, hit delete key on keyboard. Select none.
On each of the blue ring frames do the following: Selections, float, defloat, modify, expand by 4, copy and paste black, invert, hit delete key on keyboard. Move black circle below blue circles. Add drop shadow.
In each of the blue circles do the following: selections, float, defloat, tube positioned to your liking, invert, hit delete key on keyboard. Add drop shadow.
New canvas, flood fill with #da7673. Go to raster 5, selections, float, defloat, copy and paste coral color, selections, invert, hit delete key on keyboard.
New canvas, flood fill with #cf9392. Go to new Rion layer, selections, float, defloat, modify, expand by 4, copy and paste light coral color, invert, hit delete key on keyboard. Selections, float, defloat, modify, expand by 2, copy and paste black, selections, invert, hit delete key on keyboard. Move black below light coral layer. Add drop shadow.
New canvas, flood fill with #bcc1cd. Go to raster 6 selections, float, defloat, modify, expand by 1. Copy and paste light blue, invert, hit delete key on keyboard. Add drop shadow. Stay on this layer, selections, float, defloat, modify, expand by 2, copy and paste black, invert, hit delete key on keyboard. Move black below light blue layer. Add drop shadow.
New canvas, flood fill with #ce3c3b. On both raster 4 and copy of raster 4 do the following: Selections, float, defloat, copy and paste red color, invert, hit delete key on keyboard. Stay on this layer, selections, float, defloat, modify, expand by 2, copy and paste black, invert, hit delete key on keyboard. Move black layer below red layer. Add drop shadow.
Go to raster 1 layer. Selections, float, defloat, copy and paste red, invert, hit delete key on keyboard. Go to copy of vector 1, selections, float, defloat, modify, expand by 2, copy and paste black, invert, hit delete key on keyboard. Add drop shadow.
Cbg_ohlolloipop_bougainville03
Resize 38% all layers checked.
Resize 50% all layers checked.
Copy and paste as new layer, bring to top of layers, move to the right upper corner, send to bottom, duplicate, mirror. Add drop shadow on both.
Cbg_lollipop_butterfly02
Resize 94% all layers checked.
Resize 50% all layers checked
Repeat resize 50%, resize 50% again.
Copy and paste as new layer, bring to the top, move to right of tag, duplicate, mirror, place both to your liking. Add drop shadow on both.
Cbg_lollipop_flower05
Resize 59% all layers checked.
Resize 50% all layers checked.
Copy and paste as new layer, bring to the top, move to the right and place to your liking. Duplicate, mirror, drop shadow both.
Cbg_lollipop_button03
Colorize blue as before
Resize 50% , then resize 75% all layers checked
Copy and paste as new layer, move to bottom right.
Duplicate, an place both to your liking.
Colorize button03 pink as before. Copy and paste as new layer, move on top of blue buttons. Add drop shadow to all three.
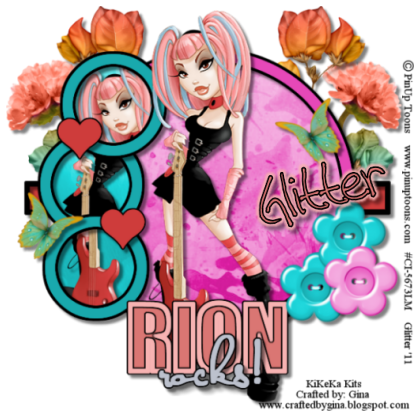
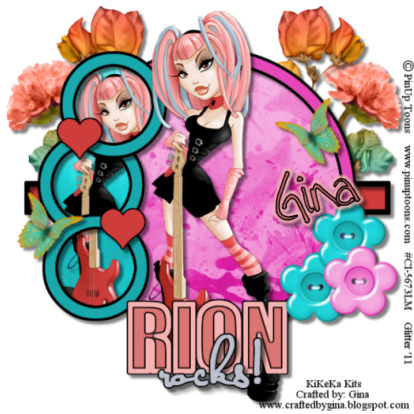
Add copyright and name.
Supplies
Scrap Kit: Oh Lollipop by KiKeKa Kits
HERE
Tube: I am using one of PinUp Toons. You need a license to buy and use this tube. I bought mine at CILM, but you can get it at CDO
HERE
Template: CBN_Template17 by Deb
This blog site is closed, sorry. If you want the template just let me know.
Font: Tall Paul
HERE
Let’s Begin
Open template 17. Shift D to duplicate template. Close out original. On duplicate template delete copyright layer. Go to Image, canvas size 760 x760. I like to work on large canvases, we will resize at end.
Cbg_ohlollipop_paper10
Resize 22 % all layers checked.
Resize 75% all layers checked.
Adjust, hue and saturation
Hue: 225 Saturation: 197
Paper is now pink.
Raster 2: Selections, select all, float, defloat, copy and paste colorized paper. Selections, invert, hit delete key on keyboard. Select none.
Copy of vector 1. Selections, float, defloat, modify, expand by 4. New canvas, flood fill with color #e648b8. Copy and paste on template canvas. Selections, invert, hit delete key on keyboard. New canvas, flood fill with black.
Go to new pink circle, selections, float, defloat, modify, expand by 4. Copy and paste black onto template canvas. Selections, invert, hit delete key on keyboard. Select none.
Add drop shadow 5, 5, 50, 5.
Copy and paste tube onto template, place on top of pink circle. Resize 115%, adjust, sharpness, sharpen. Add drop shadow as listed above.
Cbg_lollipop_paper02
Resize 22% all layers checked.
Resize 75% all layers checked.
Adjust, hue and saturation
Hue: 129 Saturation: 197
Paper is now blue.
Do the following steps to raster 3, copy of raster 3 and copy 2 of raster 3.
Selections, float, defloat, copy and paste blue paper, selections, invert, hit delete key on keyboard, select none.
Go to the pink circle, selections, float, defloat, modify, expand by 4. Copy and paste black, invert, hit the delete key on keyboard. Select none. Move black circle below pink circle. Add drop shadow.
New canvas, flood fill with #19a9ad (blue).
Do the following steps to these layers, copy of vector 1, copy 2 of vector 1 and copy 3 of vector:
Selections, float, defloat, modify, expand by 4, copy and paste blue, invert, hit delete key on keyboard. Select none.
On each of the blue ring frames do the following: Selections, float, defloat, modify, expand by 4, copy and paste black, invert, hit delete key on keyboard. Move black circle below blue circles. Add drop shadow.
In each of the blue circles do the following: selections, float, defloat, tube positioned to your liking, invert, hit delete key on keyboard. Add drop shadow.
New canvas, flood fill with #da7673. Go to raster 5, selections, float, defloat, copy and paste coral color, selections, invert, hit delete key on keyboard.
New canvas, flood fill with #cf9392. Go to new Rion layer, selections, float, defloat, modify, expand by 4, copy and paste light coral color, invert, hit delete key on keyboard. Selections, float, defloat, modify, expand by 2, copy and paste black, selections, invert, hit delete key on keyboard. Move black below light coral layer. Add drop shadow.
New canvas, flood fill with #bcc1cd. Go to raster 6 selections, float, defloat, modify, expand by 1. Copy and paste light blue, invert, hit delete key on keyboard. Add drop shadow. Stay on this layer, selections, float, defloat, modify, expand by 2, copy and paste black, invert, hit delete key on keyboard. Move black below light blue layer. Add drop shadow.
New canvas, flood fill with #ce3c3b. On both raster 4 and copy of raster 4 do the following: Selections, float, defloat, copy and paste red color, invert, hit delete key on keyboard. Stay on this layer, selections, float, defloat, modify, expand by 2, copy and paste black, invert, hit delete key on keyboard. Move black layer below red layer. Add drop shadow.
Go to raster 1 layer. Selections, float, defloat, copy and paste red, invert, hit delete key on keyboard. Go to copy of vector 1, selections, float, defloat, modify, expand by 2, copy and paste black, invert, hit delete key on keyboard. Add drop shadow.
Cbg_ohlolloipop_bougainville03
Resize 38% all layers checked.
Resize 50% all layers checked.
Copy and paste as new layer, bring to top of layers, move to the right upper corner, send to bottom, duplicate, mirror. Add drop shadow on both.
Cbg_lollipop_butterfly02
Resize 94% all layers checked.
Resize 50% all layers checked
Repeat resize 50%, resize 50% again.
Copy and paste as new layer, bring to the top, move to right of tag, duplicate, mirror, place both to your liking. Add drop shadow on both.
Cbg_lollipop_flower05
Resize 59% all layers checked.
Resize 50% all layers checked.
Copy and paste as new layer, bring to the top, move to the right and place to your liking. Duplicate, mirror, drop shadow both.
Cbg_lollipop_button03
Colorize blue as before
Resize 50% , then resize 75% all layers checked
Copy and paste as new layer, move to bottom right.
Duplicate, an place both to your liking.
Colorize button03 pink as before. Copy and paste as new layer, move on top of blue buttons. Add drop shadow to all three.
Add copyright and name.
 That’s it. Hope you enjoy my tut.
 Supplies
Scrap Kit: Oh Lollipop by KiKeKa Kits
HERE
Tube: I am using one of PinUp Toons. You need a license to buy and use this tube. I bought mine at CILM, but you can get it at CDO
HERE
Template: CBN_Template17 by Deb
This blog site is closed, sorry. If you want the template just let me know.
Font: Tall Paul
HERE
Let’s Begin
Open template 17. Shift D to duplicate template. Close out original. On duplicate template delete copyright layer. Go to Image, canvas size 760 x760. I like to work on large canvases, we will resize at end.
Cbg_ohlollipop_paper10
Resize 22 % all layers checked.
Resize 75% all layers checked.
Adjust, hue and saturation
Hue: 225 Saturation: 197
Paper is now pink.
Raster 2: Selections, select all, float, defloat, copy and paste colorized paper. Selections, invert, hit delete key on keyboard. Select none.
Copy of vector 1. Selections, float, defloat, modify, expand by 4. New canvas, flood fill with color #e648b8. Copy and paste on template canvas. Selections, invert, hit delete key on keyboard. New canvas, flood fill with black.
Go to new pink circle, selections, float, defloat, modify, expand by 4. Copy and paste black onto template canvas. Selections, invert, hit delete key on keyboard. Select none.
Add drop shadow 5, 5, 50, 5.
Copy and paste tube onto template, place on top of pink circle. Resize 115%, adjust, sharpness, sharpen. Add drop shadow as listed above.
Cbg_lollipop_paper02
Resize 22% all layers checked.
Resize 75% all layers checked.
Adjust, hue and saturation
Hue: 129 Saturation: 197
Paper is now blue.
Do the following steps to raster 3, copy of raster 3 and copy 2 of raster 3.
Selections, float, defloat, copy and paste blue paper, selections, invert, hit delete key on keyboard, select none.
Go to the pink circle, selections, float, defloat, modify, expand by 4. Copy and paste black, invert, hit the delete key on keyboard. Select none. Move black circle below pink circle. Add drop shadow.
New canvas, flood fill with #19a9ad (blue).
Do the following steps to these layers, copy of vector 1, copy 2 of vector 1 and copy 3 of vector:
Selections, float, defloat, modify, expand by 4, copy and paste blue, invert, hit delete key on keyboard. Select none.
On each of the blue ring frames do the following: Selections, float, defloat, modify, expand by 4, copy and paste black, invert, hit delete key on keyboard. Move black circle below blue circles. Add drop shadow.
In each of the blue circles do the following: selections, float, defloat, tube positioned to your liking, invert, hit delete key on keyboard. Add drop shadow.
New canvas, flood fill with #da7673. Go to raster 5, selections, float, defloat, copy and paste coral color, selections, invert, hit delete key on keyboard.
New canvas, flood fill with #cf9392. Go to new Rion layer, selections, float, defloat, modify, expand by 4, copy and paste light coral color, invert, hit delete key on keyboard. Selections, float, defloat, modify, expand by 2, copy and paste black, selections, invert, hit delete key on keyboard. Move black below light coral layer. Add drop shadow.
New canvas, flood fill with #bcc1cd. Go to raster 6 selections, float, defloat, modify, expand by 1. Copy and paste light blue, invert, hit delete key on keyboard. Add drop shadow. Stay on this layer, selections, float, defloat, modify, expand by 2, copy and paste black, invert, hit delete key on keyboard. Move black below light blue layer. Add drop shadow.
New canvas, flood fill with #ce3c3b. On both raster 4 and copy of raster 4 do the following: Selections, float, defloat, copy and paste red color, invert, hit delete key on keyboard. Stay on this layer, selections, float, defloat, modify, expand by 2, copy and paste black, invert, hit delete key on keyboard. Move black layer below red layer. Add drop shadow.
Go to raster 1 layer. Selections, float, defloat, copy and paste red, invert, hit delete key on keyboard. Go to copy of vector 1, selections, float, defloat, modify, expand by 2, copy and paste black, invert, hit delete key on keyboard. Add drop shadow.
Cbg_ohlolloipop_bougainville03
Resize 38% all layers checked.
Resize 50% all layers checked.
Copy and paste as new layer, bring to top of layers, move to the right upper corner, send to bottom, duplicate, mirror. Add drop shadow on both.
Cbg_lollipop_butterfly02
Resize 94% all layers checked.
Resize 50% all layers checked
Repeat resize 50%, resize 50% again.
Copy and paste as new layer, bring to the top, move to right of tag, duplicate, mirror, place both to your liking. Add drop shadow on both.
Cbg_lollipop_flower05
Resize 59% all layers checked.
Resize 50% all layers checked.
Copy and paste as new layer, bring to the top, move to the right and place to your liking. Duplicate, mirror, drop shadow both.
Cbg_lollipop_button03
Colorize blue as before
Resize 50% , then resize 75% all layers checked
Copy and paste as new layer, move to bottom right.
Duplicate, an place both to your liking.
Colorize button03 pink as before. Copy and paste as new layer, move on top of blue buttons. Add drop shadow to all three.
Add copyright and name.
Supplies
Scrap Kit: Oh Lollipop by KiKeKa Kits
HERE
Tube: I am using one of PinUp Toons. You need a license to buy and use this tube. I bought mine at CILM, but you can get it at CDO
HERE
Template: CBN_Template17 by Deb
This blog site is closed, sorry. If you want the template just let me know.
Font: Tall Paul
HERE
Let’s Begin
Open template 17. Shift D to duplicate template. Close out original. On duplicate template delete copyright layer. Go to Image, canvas size 760 x760. I like to work on large canvases, we will resize at end.
Cbg_ohlollipop_paper10
Resize 22 % all layers checked.
Resize 75% all layers checked.
Adjust, hue and saturation
Hue: 225 Saturation: 197
Paper is now pink.
Raster 2: Selections, select all, float, defloat, copy and paste colorized paper. Selections, invert, hit delete key on keyboard. Select none.
Copy of vector 1. Selections, float, defloat, modify, expand by 4. New canvas, flood fill with color #e648b8. Copy and paste on template canvas. Selections, invert, hit delete key on keyboard. New canvas, flood fill with black.
Go to new pink circle, selections, float, defloat, modify, expand by 4. Copy and paste black onto template canvas. Selections, invert, hit delete key on keyboard. Select none.
Add drop shadow 5, 5, 50, 5.
Copy and paste tube onto template, place on top of pink circle. Resize 115%, adjust, sharpness, sharpen. Add drop shadow as listed above.
Cbg_lollipop_paper02
Resize 22% all layers checked.
Resize 75% all layers checked.
Adjust, hue and saturation
Hue: 129 Saturation: 197
Paper is now blue.
Do the following steps to raster 3, copy of raster 3 and copy 2 of raster 3.
Selections, float, defloat, copy and paste blue paper, selections, invert, hit delete key on keyboard, select none.
Go to the pink circle, selections, float, defloat, modify, expand by 4. Copy and paste black, invert, hit the delete key on keyboard. Select none. Move black circle below pink circle. Add drop shadow.
New canvas, flood fill with #19a9ad (blue).
Do the following steps to these layers, copy of vector 1, copy 2 of vector 1 and copy 3 of vector:
Selections, float, defloat, modify, expand by 4, copy and paste blue, invert, hit delete key on keyboard. Select none.
On each of the blue ring frames do the following: Selections, float, defloat, modify, expand by 4, copy and paste black, invert, hit delete key on keyboard. Move black circle below blue circles. Add drop shadow.
In each of the blue circles do the following: selections, float, defloat, tube positioned to your liking, invert, hit delete key on keyboard. Add drop shadow.
New canvas, flood fill with #da7673. Go to raster 5, selections, float, defloat, copy and paste coral color, selections, invert, hit delete key on keyboard.
New canvas, flood fill with #cf9392. Go to new Rion layer, selections, float, defloat, modify, expand by 4, copy and paste light coral color, invert, hit delete key on keyboard. Selections, float, defloat, modify, expand by 2, copy and paste black, selections, invert, hit delete key on keyboard. Move black below light coral layer. Add drop shadow.
New canvas, flood fill with #bcc1cd. Go to raster 6 selections, float, defloat, modify, expand by 1. Copy and paste light blue, invert, hit delete key on keyboard. Add drop shadow. Stay on this layer, selections, float, defloat, modify, expand by 2, copy and paste black, invert, hit delete key on keyboard. Move black below light blue layer. Add drop shadow.
New canvas, flood fill with #ce3c3b. On both raster 4 and copy of raster 4 do the following: Selections, float, defloat, copy and paste red color, invert, hit delete key on keyboard. Stay on this layer, selections, float, defloat, modify, expand by 2, copy and paste black, invert, hit delete key on keyboard. Move black layer below red layer. Add drop shadow.
Go to raster 1 layer. Selections, float, defloat, copy and paste red, invert, hit delete key on keyboard. Go to copy of vector 1, selections, float, defloat, modify, expand by 2, copy and paste black, invert, hit delete key on keyboard. Add drop shadow.
Cbg_ohlolloipop_bougainville03
Resize 38% all layers checked.
Resize 50% all layers checked.
Copy and paste as new layer, bring to top of layers, move to the right upper corner, send to bottom, duplicate, mirror. Add drop shadow on both.
Cbg_lollipop_butterfly02
Resize 94% all layers checked.
Resize 50% all layers checked
Repeat resize 50%, resize 50% again.
Copy and paste as new layer, bring to the top, move to right of tag, duplicate, mirror, place both to your liking. Add drop shadow on both.
Cbg_lollipop_flower05
Resize 59% all layers checked.
Resize 50% all layers checked.
Copy and paste as new layer, bring to the top, move to the right and place to your liking. Duplicate, mirror, drop shadow both.
Cbg_lollipop_button03
Colorize blue as before
Resize 50% , then resize 75% all layers checked
Copy and paste as new layer, move to bottom right.
Duplicate, an place both to your liking.
Colorize button03 pink as before. Copy and paste as new layer, move on top of blue buttons. Add drop shadow to all three.
Add copyright and name.
 That’s it. Hope you enjoy my tut.
Subscribe to:
Post Comments
(Atom)
0 comments:
Post a Comment