Blinkies


Tuesday, January 25, 2011
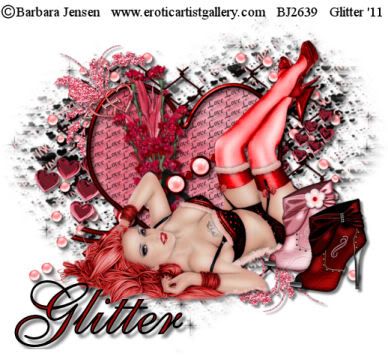
Love And Desire
 This tutorial is entirely my idea. Any similarities are purely coincidental. Hope that you enjoy working this tut as much as I did making it.
Supplies:
Love n Desire Scrap kit by Cowgirl Creations and can be found
HERE:
Tube is by Barbara Jensen and can be found
HERE:
Mask is by WeeScottLass170 and can be found
HERE:
Open Mask in PSP
Outside Filters:
MuRa’s Meister Copies
Xero Porcelain
I chose the red elements on Barb’s tube and colorized the following piece:
Stockings Silver Blue to 255, 255
Drop Shadow used throughout 5, 5, 50, 5 Black
Canvas size: 750 x 700
I start out large for plenty of room to put things, then I size down at the end.
Ok, let’s start.
1) Paper XCCLD3. Copy and paste into your canvas. Resize to 150% to cover all the canvas. Layers, New Mask Layer, From Image. Merge group. Resize 110%. Drop shadow.
2) CCLD Chain Link. Copy and paste on top of mask. Resize 110%. Colorize 255, 255. Drop shadow.
3) CCLD Pearl Scatters. Copy and paste on top of chain link, move to the left. Colorize 255, 255. Duplicate, mirror. Merge both, drop shadow.
4) CCLD Glitter Doodle 1. Copy and paste on top of pearls. Resize 70%. Move to top left corner. Duplicate, mirror, flip. Merge both, drop shadow.
5) CCLD Heart Trail. Copy and paste on top of glitter doodle layer. Resize 110%. Drop shadow.
6) CCLD Chrome Heart. Copy and paste on top of heart trail. Use magic wand, make sure all spaces are clicked. Selections, modify expand by 5.
7) XCCLD Paper 5. Copy and paste on top of chrome heart. Selections, invert, delete, move below chrome heart. DO NOT DESELECT.
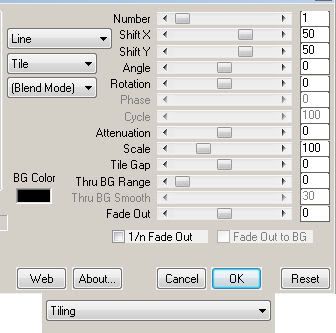
8) Using font of choice, I used Cantilope size 14 stroke 0 color black. Type out word Love, or word of choice. MuRa’s Meister copies with the following settings:
This tutorial is entirely my idea. Any similarities are purely coincidental. Hope that you enjoy working this tut as much as I did making it.
Supplies:
Love n Desire Scrap kit by Cowgirl Creations and can be found
HERE:
Tube is by Barbara Jensen and can be found
HERE:
Mask is by WeeScottLass170 and can be found
HERE:
Open Mask in PSP
Outside Filters:
MuRa’s Meister Copies
Xero Porcelain
I chose the red elements on Barb’s tube and colorized the following piece:
Stockings Silver Blue to 255, 255
Drop Shadow used throughout 5, 5, 50, 5 Black
Canvas size: 750 x 700
I start out large for plenty of room to put things, then I size down at the end.
Ok, let’s start.
1) Paper XCCLD3. Copy and paste into your canvas. Resize to 150% to cover all the canvas. Layers, New Mask Layer, From Image. Merge group. Resize 110%. Drop shadow.
2) CCLD Chain Link. Copy and paste on top of mask. Resize 110%. Colorize 255, 255. Drop shadow.
3) CCLD Pearl Scatters. Copy and paste on top of chain link, move to the left. Colorize 255, 255. Duplicate, mirror. Merge both, drop shadow.
4) CCLD Glitter Doodle 1. Copy and paste on top of pearls. Resize 70%. Move to top left corner. Duplicate, mirror, flip. Merge both, drop shadow.
5) CCLD Heart Trail. Copy and paste on top of glitter doodle layer. Resize 110%. Drop shadow.
6) CCLD Chrome Heart. Copy and paste on top of heart trail. Use magic wand, make sure all spaces are clicked. Selections, modify expand by 5.
7) XCCLD Paper 5. Copy and paste on top of chrome heart. Selections, invert, delete, move below chrome heart. DO NOT DESELECT.
8) Using font of choice, I used Cantilope size 14 stroke 0 color black. Type out word Love, or word of choice. MuRa’s Meister copies with the following settings:
 9) SSLD Blossum Stick. Resize 70%. Duplicate, mirror, rotate duplicate left 15. Merge both.
10) CCLD Flower Plant 4. Resize 70%. Merge with blossum stick layer. Put this below Chrome heart layer. Duplicate, put duplicate above heart layer and erase parts over the middle bar of chrome heart. Drop shadow both layers.
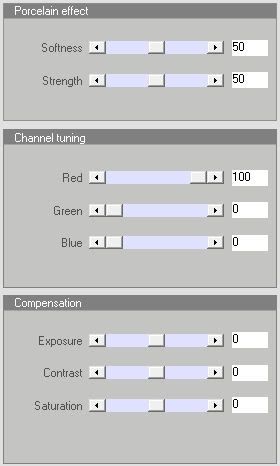
11) Copy and paste Barb’s tube. Apply Xero porcelain with these settings:
9) SSLD Blossum Stick. Resize 70%. Duplicate, mirror, rotate duplicate left 15. Merge both.
10) CCLD Flower Plant 4. Resize 70%. Merge with blossum stick layer. Put this below Chrome heart layer. Duplicate, put duplicate above heart layer and erase parts over the middle bar of chrome heart. Drop shadow both layers.
11) Copy and paste Barb’s tube. Apply Xero porcelain with these settings:
 12) CCLD Boot 1 and CCLD Boot 2. Resize both boots 70%, mirror, put in lower right hand corner stacking them on top of each other and offset them.
13) Resize tag to you liking. This is what I do. I save tag in psp format first. Then I merge visible, copy and paste as new image. Resize tag 97%, all layers NOT checked. Resize tag 70%, all layers ARE checked. Add credit info.
14) Apply name or saying that you wish. Save in either png format or jpg format.
We are finished. Thanks for looking at my tut. I would love to see your results. You can send them to me at glitterdeb75@yahoo.com I will put them here on my blog to display them.
12) CCLD Boot 1 and CCLD Boot 2. Resize both boots 70%, mirror, put in lower right hand corner stacking them on top of each other and offset them.
13) Resize tag to you liking. This is what I do. I save tag in psp format first. Then I merge visible, copy and paste as new image. Resize tag 97%, all layers NOT checked. Resize tag 70%, all layers ARE checked. Add credit info.
14) Apply name or saying that you wish. Save in either png format or jpg format.
We are finished. Thanks for looking at my tut. I would love to see your results. You can send them to me at glitterdeb75@yahoo.com I will put them here on my blog to display them.
 This tutorial is entirely my idea. Any similarities are purely coincidental. Hope that you enjoy working this tut as much as I did making it.
Supplies:
Love n Desire Scrap kit by Cowgirl Creations and can be found
HERE:
Tube is by Barbara Jensen and can be found
HERE:
Mask is by WeeScottLass170 and can be found
HERE:
Open Mask in PSP
Outside Filters:
MuRa’s Meister Copies
Xero Porcelain
I chose the red elements on Barb’s tube and colorized the following piece:
Stockings Silver Blue to 255, 255
Drop Shadow used throughout 5, 5, 50, 5 Black
Canvas size: 750 x 700
I start out large for plenty of room to put things, then I size down at the end.
Ok, let’s start.
1) Paper XCCLD3. Copy and paste into your canvas. Resize to 150% to cover all the canvas. Layers, New Mask Layer, From Image. Merge group. Resize 110%. Drop shadow.
2) CCLD Chain Link. Copy and paste on top of mask. Resize 110%. Colorize 255, 255. Drop shadow.
3) CCLD Pearl Scatters. Copy and paste on top of chain link, move to the left. Colorize 255, 255. Duplicate, mirror. Merge both, drop shadow.
4) CCLD Glitter Doodle 1. Copy and paste on top of pearls. Resize 70%. Move to top left corner. Duplicate, mirror, flip. Merge both, drop shadow.
5) CCLD Heart Trail. Copy and paste on top of glitter doodle layer. Resize 110%. Drop shadow.
6) CCLD Chrome Heart. Copy and paste on top of heart trail. Use magic wand, make sure all spaces are clicked. Selections, modify expand by 5.
7) XCCLD Paper 5. Copy and paste on top of chrome heart. Selections, invert, delete, move below chrome heart. DO NOT DESELECT.
8) Using font of choice, I used Cantilope size 14 stroke 0 color black. Type out word Love, or word of choice. MuRa’s Meister copies with the following settings:
This tutorial is entirely my idea. Any similarities are purely coincidental. Hope that you enjoy working this tut as much as I did making it.
Supplies:
Love n Desire Scrap kit by Cowgirl Creations and can be found
HERE:
Tube is by Barbara Jensen and can be found
HERE:
Mask is by WeeScottLass170 and can be found
HERE:
Open Mask in PSP
Outside Filters:
MuRa’s Meister Copies
Xero Porcelain
I chose the red elements on Barb’s tube and colorized the following piece:
Stockings Silver Blue to 255, 255
Drop Shadow used throughout 5, 5, 50, 5 Black
Canvas size: 750 x 700
I start out large for plenty of room to put things, then I size down at the end.
Ok, let’s start.
1) Paper XCCLD3. Copy and paste into your canvas. Resize to 150% to cover all the canvas. Layers, New Mask Layer, From Image. Merge group. Resize 110%. Drop shadow.
2) CCLD Chain Link. Copy and paste on top of mask. Resize 110%. Colorize 255, 255. Drop shadow.
3) CCLD Pearl Scatters. Copy and paste on top of chain link, move to the left. Colorize 255, 255. Duplicate, mirror. Merge both, drop shadow.
4) CCLD Glitter Doodle 1. Copy and paste on top of pearls. Resize 70%. Move to top left corner. Duplicate, mirror, flip. Merge both, drop shadow.
5) CCLD Heart Trail. Copy and paste on top of glitter doodle layer. Resize 110%. Drop shadow.
6) CCLD Chrome Heart. Copy and paste on top of heart trail. Use magic wand, make sure all spaces are clicked. Selections, modify expand by 5.
7) XCCLD Paper 5. Copy and paste on top of chrome heart. Selections, invert, delete, move below chrome heart. DO NOT DESELECT.
8) Using font of choice, I used Cantilope size 14 stroke 0 color black. Type out word Love, or word of choice. MuRa’s Meister copies with the following settings:
 9) SSLD Blossum Stick. Resize 70%. Duplicate, mirror, rotate duplicate left 15. Merge both.
10) CCLD Flower Plant 4. Resize 70%. Merge with blossum stick layer. Put this below Chrome heart layer. Duplicate, put duplicate above heart layer and erase parts over the middle bar of chrome heart. Drop shadow both layers.
11) Copy and paste Barb’s tube. Apply Xero porcelain with these settings:
9) SSLD Blossum Stick. Resize 70%. Duplicate, mirror, rotate duplicate left 15. Merge both.
10) CCLD Flower Plant 4. Resize 70%. Merge with blossum stick layer. Put this below Chrome heart layer. Duplicate, put duplicate above heart layer and erase parts over the middle bar of chrome heart. Drop shadow both layers.
11) Copy and paste Barb’s tube. Apply Xero porcelain with these settings:
 12) CCLD Boot 1 and CCLD Boot 2. Resize both boots 70%, mirror, put in lower right hand corner stacking them on top of each other and offset them.
13) Resize tag to you liking. This is what I do. I save tag in psp format first. Then I merge visible, copy and paste as new image. Resize tag 97%, all layers NOT checked. Resize tag 70%, all layers ARE checked. Add credit info.
14) Apply name or saying that you wish. Save in either png format or jpg format.
We are finished. Thanks for looking at my tut. I would love to see your results. You can send them to me at glitterdeb75@yahoo.com I will put them here on my blog to display them.
12) CCLD Boot 1 and CCLD Boot 2. Resize both boots 70%, mirror, put in lower right hand corner stacking them on top of each other and offset them.
13) Resize tag to you liking. This is what I do. I save tag in psp format first. Then I merge visible, copy and paste as new image. Resize tag 97%, all layers NOT checked. Resize tag 70%, all layers ARE checked. Add credit info.
14) Apply name or saying that you wish. Save in either png format or jpg format.
We are finished. Thanks for looking at my tut. I would love to see your results. You can send them to me at glitterdeb75@yahoo.com I will put them here on my blog to display them.
Subscribe to:
Post Comments
(Atom)
0 comments:
Post a Comment