Blinkies


Monday, October 31, 2011
 Supplies
Tube: I am using the awesome art from Ismael Rac. Please don’t use this tube unless you have the proper license for it and it was obtained legally. HERE
Mask: Vix Mask_Halloween0901 HERE
Scrap kit: Monster Among Us by Brenda of Brenda’s Scrap Design HERE
Font: JI-Blench I don't remember where I got this and I have searched the web for it but can't find it. Any Halloween font will work.
Outside Filters: Eye Candy 3.1 Glass
Eye Candy 3.1 Glow
Xero Porcelain
Let’s get started
bsd_MAU_element122
Duplicate frame by shift+D Resize 22% then 50% all layers checked. Image canvas size 750 x750
Supplies
Tube: I am using the awesome art from Ismael Rac. Please don’t use this tube unless you have the proper license for it and it was obtained legally. HERE
Mask: Vix Mask_Halloween0901 HERE
Scrap kit: Monster Among Us by Brenda of Brenda’s Scrap Design HERE
Font: JI-Blench I don't remember where I got this and I have searched the web for it but can't find it. Any Halloween font will work.
Outside Filters: Eye Candy 3.1 Glass
Eye Candy 3.1 Glow
Xero Porcelain
Let’s get started
bsd_MAU_element122
Duplicate frame by shift+D Resize 22% then 50% all layers checked. Image canvas size 750 x750
 bsd_MAU_paper3
Resize 99% all layers checked
Copy & Paste (C&P) paper behind frame. Apply mask by Layers, New mask layer, From image.
bsd_MAU_paper3
Resize 99% all layers checked
Copy & Paste (C&P) paper behind frame. Apply mask by Layers, New mask layer, From image.
 Merge group. Duplicate mask layer. On original mask layer Adjust, Blur, Gaussian Blur 15.00
 Effects, Textures, Mosaic Glass,
 default settings.
 Add drop shadow 2, 2, 50, 5.
bsd_MAU_paper8
Resize 64% then 50% all layers checked. Copy.
Back to frame level, with magic wand click inside frame. Select, modify, expand by 8,
Add drop shadow 2, 2, 50, 5.
bsd_MAU_paper8
Resize 64% then 50% all layers checked. Copy.
Back to frame level, with magic wand click inside frame. Select, modify, expand by 8,
 paste paper and place behind frame, resize by 50% all layers NOT checked. Selections, invert, delete key.
bsd_MAU_element18
bsd_MAU_element19
Do the following to both elements:
Resize 50% all layers checked, C&P on top of frame, resize again to your liking and place in top left corner.
bsd_MAU_element4
bsd_MAU_element6
bsd_MAU_element7
bsd_MAU_element8
bsd_MAU_element9
Resize all elements to your liking. C&P and place in lower left corner, mirror some.
Go back to frame level, click magic wand in frame, selections, modify by 8, paste tube of choice, resize and place where you want them. Duplicate tube layer. Go back to original tube layer, selections, invert, delete key. Place this below frame. On duplicate tube erase the parts you want deleted.
Put drop shadow on all layers with settings below.
paste paper and place behind frame, resize by 50% all layers NOT checked. Selections, invert, delete key.
bsd_MAU_element18
bsd_MAU_element19
Do the following to both elements:
Resize 50% all layers checked, C&P on top of frame, resize again to your liking and place in top left corner.
bsd_MAU_element4
bsd_MAU_element6
bsd_MAU_element7
bsd_MAU_element8
bsd_MAU_element9
Resize all elements to your liking. C&P and place in lower left corner, mirror some.
Go back to frame level, click magic wand in frame, selections, modify by 8, paste tube of choice, resize and place where you want them. Duplicate tube layer. Go back to original tube layer, selections, invert, delete key. Place this below frame. On duplicate tube erase the parts you want deleted.
Put drop shadow on all layers with settings below.
 Merge visible, copy and paste as a new image. This should have resized it some. Resize down to your liking, not to exceed 525 X 525.
Add copyright and watermark.
Thanks for checking out my tut. Would love to see your results. I hope you enjoyed my tut.
Merge visible, copy and paste as a new image. This should have resized it some. Resize down to your liking, not to exceed 525 X 525.
Add copyright and watermark.
Thanks for checking out my tut. Would love to see your results. I hope you enjoyed my tut.

Sunday, October 30, 2011
 Supplies
Scrap kit by Gina at KiKeKa’s Kits
HERE
Mask by Vix Vix_MaskHalloween0905
HERE
scrool about three-fourths the way down the page.
Font used is Halloween_Argentine
HERE
I used tubes by the amazing artist Barbara Jensen. Don’t use these tubes unless you have the proper license to use them, and acquire the tubes legally.
HERE
Outside Filters used
Eye Candy 3.1 Glass, Glow
Xero Porcelain
Let’s get started
Cbg_Spookalious_frame_02
Duplicate original by shift+D
Resize 35% then resize 50% all layers checked
Image canvas size 750 x 538 lock ratio aspect checked (see below)
Supplies
Scrap kit by Gina at KiKeKa’s Kits
HERE
Mask by Vix Vix_MaskHalloween0905
HERE
scrool about three-fourths the way down the page.
Font used is Halloween_Argentine
HERE
I used tubes by the amazing artist Barbara Jensen. Don’t use these tubes unless you have the proper license to use them, and acquire the tubes legally.
HERE
Outside Filters used
Eye Candy 3.1 Glass, Glow
Xero Porcelain
Let’s get started
Cbg_Spookalious_frame_02
Duplicate original by shift+D
Resize 35% then resize 50% all layers checked
Image canvas size 750 x 538 lock ratio aspect checked (see below)
 Cbg_Spookalious_paper14
Resize 22% all layers checked
Copy paper in frame canvas select all, paste paper, invert, delete key. Now the paper fits canvas size. Colorize 255, 255 by Adjust, Hue & Saturation, Colorize (see below)
Cbg_Spookalious_paper14
Resize 22% all layers checked
Copy paper in frame canvas select all, paste paper, invert, delete key. Now the paper fits canvas size. Colorize 255, 255 by Adjust, Hue & Saturation, Colorize (see below)
 Apply mask. Layers, New mask layer, from image, apply mask. Merge group. (see below)
 Duplicate mask layer. On original layer apply mosaic glass, default settings. (see below)

 Cbg_Spookalious_paper09
Resize 22%
On frame layer hold down shift key, click magic wand in all three frames. Select, modify, expand 8.
Copy & Paste (c&p) below frame
Select, invert, delete key.
Cbg_Spookalious_paper09
Resize 22%
On frame layer hold down shift key, click magic wand in all three frames. Select, modify, expand 8.
Copy & Paste (c&p) below frame
Select, invert, delete key.
 Use the following steps in all 3 frames.
Click magic wand in frame
Select, modify, expand by 8
Paste tube and resize and position as desired.
Duplicate tube layer and cross out eye (see below)
Use the following steps in all 3 frames.
Click magic wand in frame
Select, modify, expand by 8
Paste tube and resize and position as desired.
Duplicate tube layer and cross out eye (see below)
 Go back to original tube layer.
Select, invert, delete key.
Apply drop shadow to copy of tube.
Open eye and using your eraser erase all unwanted parts. Be careful around where the drop shadow is so you don’t erase too much.
Apply porcelain using default settings.
Go back to original tube layer.
Select, invert, delete key.
Apply drop shadow to copy of tube.
Open eye and using your eraser erase all unwanted parts. Be careful around where the drop shadow is so you don’t erase too much.
Apply porcelain using default settings.
 Cbg_Spookalious_spider02
Cbg_Spookalious_spider01
Resize 50% all layers checked, repeat.
C&P onto tag, resize and place to your liking. I resized 50% again and placed on top of spiders on the frame, making them bigger.
Cbg_Spookalious_pumpkin01
Resize 60%, then 50% all layers checked
C&P onto tag, duplicate 2 times, (should have 3 pumpkins now) resize 1 50%, 1 60%, 1 75%. Place as desired.
Cbg_Spookalious_flower02
Cbg_Spookalious_flower03
Resize 50% all layers checked
I colorized the orange flower red 255, 255. Take the magic wand and when holding down the shift key keep clicking the magic wand on the parts you want to colorize. Do this until you have your desired effect.
C&P 1 purple flower, 1 red flower, and 1 orange flower and place where you like. Drop shadow all three.
Cbg_Spookalious_candycorn01
Cbg_Spookalious_candycorn02
Cbg_Spookalious_candycorn03
Do this to all 3
Resize 50% all layers checked.
C&P all 3 onto tag, duplicate the yellow one three times, colorize 1 blue, 1 red, 1 orange. (see below)
Cbg_Spookalious_spider02
Cbg_Spookalious_spider01
Resize 50% all layers checked, repeat.
C&P onto tag, resize and place to your liking. I resized 50% again and placed on top of spiders on the frame, making them bigger.
Cbg_Spookalious_pumpkin01
Resize 60%, then 50% all layers checked
C&P onto tag, duplicate 2 times, (should have 3 pumpkins now) resize 1 50%, 1 60%, 1 75%. Place as desired.
Cbg_Spookalious_flower02
Cbg_Spookalious_flower03
Resize 50% all layers checked
I colorized the orange flower red 255, 255. Take the magic wand and when holding down the shift key keep clicking the magic wand on the parts you want to colorize. Do this until you have your desired effect.
C&P 1 purple flower, 1 red flower, and 1 orange flower and place where you like. Drop shadow all three.
Cbg_Spookalious_candycorn01
Cbg_Spookalious_candycorn02
Cbg_Spookalious_candycorn03
Do this to all 3
Resize 50% all layers checked.
C&P all 3 onto tag, duplicate the yellow one three times, colorize 1 blue, 1 red, 1 orange. (see below)


 Cluster all candy corn together, rotate some to your liking, drop shadow all, merge together. Duplicate, place at opposite corners.
Using font listed above type out
Give Me Something Good To Eat
or something along that line. Stretch wording to your liking and place where desired.
Add glass using default settings, apply glow. (see below)
Cluster all candy corn together, rotate some to your liking, drop shadow all, merge together. Duplicate, place at opposite corners.
Using font listed above type out
Give Me Something Good To Eat
or something along that line. Stretch wording to your liking and place where desired.
Add glass using default settings, apply glow. (see below)
 Add drop shadow to any elements you may have missed. On mask add drop shadow 1, 1, 50, 5.
Merge all layers together, resize.
Add copyright and watermark.
Add names.
Add drop shadow to any elements you may have missed. On mask add drop shadow 1, 1, 50, 5.
Merge all layers together, resize.
Add copyright and watermark.
Add names.

Thursday, October 20, 2011
 This tut is entirely of my creation. Any resemblance to others is purely coincidental.
Supplies:
Scrap kit: Spooky Mix by KiKeKa Kits which you can get HERE
Tube: I am using an awesome tube by Barbara Jensen that you can purchase HERE. Please DO NOT use this tube without a proper license and you have purchased it legally.
Mask: Vix_MaskHalloween0906 which you can find HERE
Scroll down to 27th October 2009 Masks 416-426 plus 2009 Halloween masks
Font: I used font Halloween_BeneCryptine which you can find HERE
Let’s get started.
I am writing this for beginners as well as the experienced tagger. There aren’t that many tuts for the beginners so I try to write all my tuts for the beginners.
Open new canvas 600 x 600 transparent.
cbg_spookymix_spiderweb01 shift+D Duplicate element. Resize 75% all layers checked. Resize 50% all layers checked. Copy and paste (c&p) web into new canvas. Resize web 50% all layers NOT checked. Move to the side.
This tut is entirely of my creation. Any resemblance to others is purely coincidental.
Supplies:
Scrap kit: Spooky Mix by KiKeKa Kits which you can get HERE
Tube: I am using an awesome tube by Barbara Jensen that you can purchase HERE. Please DO NOT use this tube without a proper license and you have purchased it legally.
Mask: Vix_MaskHalloween0906 which you can find HERE
Scroll down to 27th October 2009 Masks 416-426 plus 2009 Halloween masks
Font: I used font Halloween_BeneCryptine which you can find HERE
Let’s get started.
I am writing this for beginners as well as the experienced tagger. There aren’t that many tuts for the beginners so I try to write all my tuts for the beginners.
Open new canvas 600 x 600 transparent.
cbg_spookymix_spiderweb01 shift+D Duplicate element. Resize 75% all layers checked. Resize 50% all layers checked. Copy and paste (c&p) web into new canvas. Resize web 50% all layers NOT checked. Move to the side.
 In layers palette Duplicate layer.
 Image, mirror.
 Move web pieces together. Merge together.
 In layers palette Duplicate layer. Image, flip. Move web pieces together.
 I like my web darker so:
Selections, select all, selections, float, selections, defloat, c&p black as new layer, selections, invert, delete key on keyboard, selections, select none. Adjust, Add/Remove noise, Add noise using settings below. Apply noise twice.
I like my web darker so:
Selections, select all, selections, float, selections, defloat, c&p black as new layer, selections, invert, delete key on keyboard, selections, select none. Adjust, Add/Remove noise, Add noise using settings below. Apply noise twice.
 Set web canvas aside for now.
cbg_spookymix_paper02 Resize paper 22% all layers checked. Copy paper.
New canvas 600 x 600. Selections, select all, paste paper into new canvas. Resize paper 77% all layers NOT checked. Selections, invert, delete key, selections, select none.
Open Vix_MaskHalloween0906 in psp. Layers, new mask layer, from image. Layers, merge, merge group.
Set web canvas aside for now.
cbg_spookymix_paper02 Resize paper 22% all layers checked. Copy paper.
New canvas 600 x 600. Selections, select all, paste paper into new canvas. Resize paper 77% all layers NOT checked. Selections, invert, delete key, selections, select none.
Open Vix_MaskHalloween0906 in psp. Layers, new mask layer, from image. Layers, merge, merge group.
 C&P web on top of mask layer.
 Resize the elements as follows:
cbg_spookymix_bat01 50% all layers checked
cbg_spookymix_bat02 50% all layers checked
cbg_spookymix_bat03 50% all layers checked
cbg_spookymix_webstring 32% all layers checked then 50% all layers checked
cbg_spookymix_spider02 87% all layers checked then 50% all layers checked
C&P all elements on top of web, resize and place to your liking. Set aside.
New canvas 600 x 600. Type out Trick Or Treat, or something else if you prefer, using font Halloween_BeneCryptine. Apply glow using image below as a guide.
Resize the elements as follows:
cbg_spookymix_bat01 50% all layers checked
cbg_spookymix_bat02 50% all layers checked
cbg_spookymix_bat03 50% all layers checked
cbg_spookymix_webstring 32% all layers checked then 50% all layers checked
cbg_spookymix_spider02 87% all layers checked then 50% all layers checked
C&P all elements on top of web, resize and place to your liking. Set aside.
New canvas 600 x 600. Type out Trick Or Treat, or something else if you prefer, using font Halloween_BeneCryptine. Apply glow using image below as a guide.
 Selections, select all, selections, float, selections, defloat, selections, modify, expand by 3, c&p black, selections, invert, delete key, selections, select none. Place black under words. Add drop shadow as indicated below. C&P word art into tag.
 Add tube of your choice, resizing and placing to your liking. Apply drop shadow as before.
Add drop shadow as before to all element layers, including web. Add drop shadow of 2, 2, 50, 5 to mask layer. Merge visible. Resize tag 87% all layers checked.
Add copyright info and watermark to tag. Save as jpeg or png as your template. Add your name using same font as for word art.
I hope you like my tut.
Add tube of your choice, resizing and placing to your liking. Apply drop shadow as before.
Add drop shadow as before to all element layers, including web. Add drop shadow of 2, 2, 50, 5 to mask layer. Merge visible. Resize tag 87% all layers checked.
Add copyright info and watermark to tag. Save as jpeg or png as your template. Add your name using same font as for word art.
I hope you like my tut.

Hello, I am back for now. My arm is still not doing right. I now have a bone stimilater on for 10 hours a day. This sends electric impulses to the bone to help it heal faster. I don't feel anything but it makes my arm tired. I can hear it clicking when it is on. Boy am I glad I have insurance, this machine costs $5000 and I won't have to pay anything for it, the insurance will cover it all. When I broke my arm they didn't check my shoulder and it was giving me more and more fits, so they did a bone scan and found some hot spots that showed where it was not mending correctly and my shoulder was a big hot spot. So I had an MRI of my shoulder done. I didn't tear any ligaments or my ACL, but I wrenched my shoulder. Doctor gave me a shot of cortisone in the shoulder and I will get another one in December. He wants to try this way before he does surgery again. I am probably looking at one more surgery on my elbow, to take out a bit of the hardware, but he wants to wait at least a year before he does that. So I get to be in pain longer now, fun, fun. NOT.
I had my hernia repaired September 19 and on the 20th I fell again. I was staying at Mom's and she was at work. I laid on the floor for about an hour before she got home, I hurt like hell. I called my surgeon and he said that if the staples didn't pop open I was ok, then I called my bone doctor and he called a doctor in Salina where I was staying to check my arm and I didn't rebreak anything. I was so releived. I didn't want to rebreak the arm again.
This past 2 weeks I have been in contact with 2 of my high school classmates. It was so good to hear from them again, it has been 18 years since I was in contact with them and then to talk to 2 of them in 2 weeks was exciting. We are talking about the whole class getting together again soon. 18 years between get-togethers is too long. We have lost 2 classmates, and we need to re-connect before we lose anyone else.
Well, I need to get this posted. Will be posting another tut shortly.
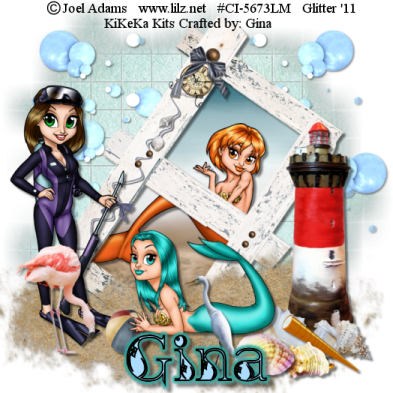
Sunday, July 24, 2011
By The Sea
This tut is entirely my creation. Any resemblances are purely coincidental.
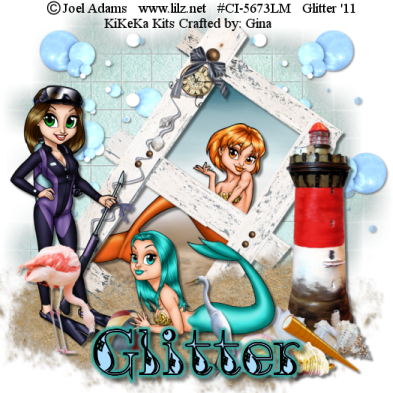 Supplies
Scrap Kit: By The Sea by KiKeKa Kits
HERE
Mask: WSL_84
HERE
3 Tubes by the same artist: I used tubes by Joel Adams which I purchased through CILM. You can get the tubes at CDO. Please don’t use these tubes without purchasing them. You must also get a license number from CDO.
HERE
Font: Kingthings Inkydink
HERE
Open a new canvas and go to Images, canvas resize 760 x 760. We will resize at the end.
Open cbg_bythesea_paper07. Resize by 99% to get to 100%. Copy & paste into your canvas. Open mask. Go to layers, new mask layer, from image. Merge group. I added a drop shadow of 1, 1, 50, 5.
Open cbg_bythesea_bubbles01. Copy & paste onto your canvas. Resize 50% then 80% all layers NOT checked. Place in upper right. Duplicate, mirror. Duplicate original again and rotate 45%. Merge all 3 bubble layers, add a drop shadow of 2, 2, 50, 5.
Open cbg_bythesea_frame02. Copy and paste onto your canvas. Rotate right 35%.
Open Use your magic and click inside both frame holes. Selections, modify, expand by 12. Keep repeating expand until you get the ants to cover all the inside of your frame. This will make it have the ants outside the frame itself in a few places. Open paper cbg_bythesea_paper02. Resize 99%, then 75% all layers checked. Copy & paste onto canvas and place under frame. Resize until you get the picture you want. Selections, invert, hit delete key on keyboard. Selections, select none.
Open cbg_bythesea_lighthouse. Copy and paste onto your canvas. Resize 80% and place to the right of frame.
Open the following elements and copy and paste them onto your canvas, one at a time. Resize each one to your liking and place where you want them.
Cbg_bythesea_scpoe
Cbg_bythesea_shell01
Cbg_bythesea_shell02
Cbg_bythesea_shell03
Cbg_bythesea_shell04
Cbg_bythesea_ball01
Cbg_bythesea_bird01
Cbg_bythesea_bird02 Mirror both birds
Give each of your elements and frame a drop shadow of 2, 2, 50, 5.
Open up cbg_bythesea_sand. Copy and paste sand onto your canvas 4 times. Rearrange sand to your liking. Merge all sand together and add drop shadow of 1, 1, 50, 5.
Open up tubes. Copy and place where you want them. Resize as needed. Place a drop shadow of 2, 2, 50, 5.
Mask and sand have a drop shadow of 1, 1, 50, 5. Everything else has a drop shadow of 2, 2, 50, 5.
Here I save it in psp form to move things if need be. Merge visible, resize 97% all layers NOT checked. Resize again down so your canvas is not larger than 525 x 525.
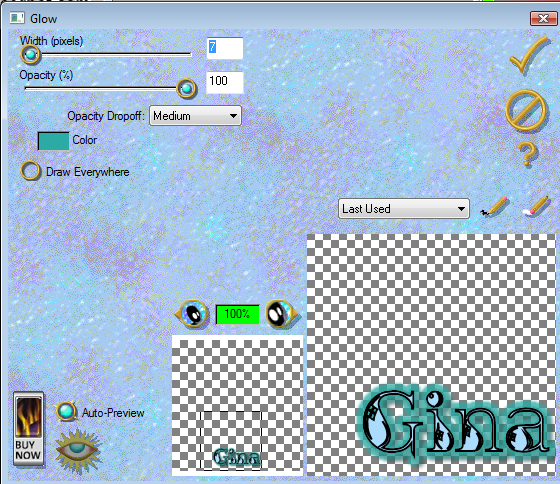
Add your copyright info, add name (I put a glow on my name, see below), and we are done.
Supplies
Scrap Kit: By The Sea by KiKeKa Kits
HERE
Mask: WSL_84
HERE
3 Tubes by the same artist: I used tubes by Joel Adams which I purchased through CILM. You can get the tubes at CDO. Please don’t use these tubes without purchasing them. You must also get a license number from CDO.
HERE
Font: Kingthings Inkydink
HERE
Open a new canvas and go to Images, canvas resize 760 x 760. We will resize at the end.
Open cbg_bythesea_paper07. Resize by 99% to get to 100%. Copy & paste into your canvas. Open mask. Go to layers, new mask layer, from image. Merge group. I added a drop shadow of 1, 1, 50, 5.
Open cbg_bythesea_bubbles01. Copy & paste onto your canvas. Resize 50% then 80% all layers NOT checked. Place in upper right. Duplicate, mirror. Duplicate original again and rotate 45%. Merge all 3 bubble layers, add a drop shadow of 2, 2, 50, 5.
Open cbg_bythesea_frame02. Copy and paste onto your canvas. Rotate right 35%.
Open Use your magic and click inside both frame holes. Selections, modify, expand by 12. Keep repeating expand until you get the ants to cover all the inside of your frame. This will make it have the ants outside the frame itself in a few places. Open paper cbg_bythesea_paper02. Resize 99%, then 75% all layers checked. Copy & paste onto canvas and place under frame. Resize until you get the picture you want. Selections, invert, hit delete key on keyboard. Selections, select none.
Open cbg_bythesea_lighthouse. Copy and paste onto your canvas. Resize 80% and place to the right of frame.
Open the following elements and copy and paste them onto your canvas, one at a time. Resize each one to your liking and place where you want them.
Cbg_bythesea_scpoe
Cbg_bythesea_shell01
Cbg_bythesea_shell02
Cbg_bythesea_shell03
Cbg_bythesea_shell04
Cbg_bythesea_ball01
Cbg_bythesea_bird01
Cbg_bythesea_bird02 Mirror both birds
Give each of your elements and frame a drop shadow of 2, 2, 50, 5.
Open up cbg_bythesea_sand. Copy and paste sand onto your canvas 4 times. Rearrange sand to your liking. Merge all sand together and add drop shadow of 1, 1, 50, 5.
Open up tubes. Copy and place where you want them. Resize as needed. Place a drop shadow of 2, 2, 50, 5.
Mask and sand have a drop shadow of 1, 1, 50, 5. Everything else has a drop shadow of 2, 2, 50, 5.
Here I save it in psp form to move things if need be. Merge visible, resize 97% all layers NOT checked. Resize again down so your canvas is not larger than 525 x 525.
Add your copyright info, add name (I put a glow on my name, see below), and we are done.
 I hope you enjoyed my tut.
If you do any of my tuts please send to me at my email addy of glitterdeb75@yahoo.com and I will put them on my blog.
I hope you enjoyed my tut.
If you do any of my tuts please send to me at my email addy of glitterdeb75@yahoo.com and I will put them on my blog.
 Supplies
Scrap Kit: By The Sea by KiKeKa Kits
HERE
Mask: WSL_84
HERE
3 Tubes by the same artist: I used tubes by Joel Adams which I purchased through CILM. You can get the tubes at CDO. Please don’t use these tubes without purchasing them. You must also get a license number from CDO.
HERE
Font: Kingthings Inkydink
HERE
Open a new canvas and go to Images, canvas resize 760 x 760. We will resize at the end.
Open cbg_bythesea_paper07. Resize by 99% to get to 100%. Copy & paste into your canvas. Open mask. Go to layers, new mask layer, from image. Merge group. I added a drop shadow of 1, 1, 50, 5.
Open cbg_bythesea_bubbles01. Copy & paste onto your canvas. Resize 50% then 80% all layers NOT checked. Place in upper right. Duplicate, mirror. Duplicate original again and rotate 45%. Merge all 3 bubble layers, add a drop shadow of 2, 2, 50, 5.
Open cbg_bythesea_frame02. Copy and paste onto your canvas. Rotate right 35%.
Open Use your magic and click inside both frame holes. Selections, modify, expand by 12. Keep repeating expand until you get the ants to cover all the inside of your frame. This will make it have the ants outside the frame itself in a few places. Open paper cbg_bythesea_paper02. Resize 99%, then 75% all layers checked. Copy & paste onto canvas and place under frame. Resize until you get the picture you want. Selections, invert, hit delete key on keyboard. Selections, select none.
Open cbg_bythesea_lighthouse. Copy and paste onto your canvas. Resize 80% and place to the right of frame.
Open the following elements and copy and paste them onto your canvas, one at a time. Resize each one to your liking and place where you want them.
Cbg_bythesea_scpoe
Cbg_bythesea_shell01
Cbg_bythesea_shell02
Cbg_bythesea_shell03
Cbg_bythesea_shell04
Cbg_bythesea_ball01
Cbg_bythesea_bird01
Cbg_bythesea_bird02 Mirror both birds
Give each of your elements and frame a drop shadow of 2, 2, 50, 5.
Open up cbg_bythesea_sand. Copy and paste sand onto your canvas 4 times. Rearrange sand to your liking. Merge all sand together and add drop shadow of 1, 1, 50, 5.
Open up tubes. Copy and place where you want them. Resize as needed. Place a drop shadow of 2, 2, 50, 5.
Mask and sand have a drop shadow of 1, 1, 50, 5. Everything else has a drop shadow of 2, 2, 50, 5.
Here I save it in psp form to move things if need be. Merge visible, resize 97% all layers NOT checked. Resize again down so your canvas is not larger than 525 x 525.
Add your copyright info, add name (I put a glow on my name, see below), and we are done.
Supplies
Scrap Kit: By The Sea by KiKeKa Kits
HERE
Mask: WSL_84
HERE
3 Tubes by the same artist: I used tubes by Joel Adams which I purchased through CILM. You can get the tubes at CDO. Please don’t use these tubes without purchasing them. You must also get a license number from CDO.
HERE
Font: Kingthings Inkydink
HERE
Open a new canvas and go to Images, canvas resize 760 x 760. We will resize at the end.
Open cbg_bythesea_paper07. Resize by 99% to get to 100%. Copy & paste into your canvas. Open mask. Go to layers, new mask layer, from image. Merge group. I added a drop shadow of 1, 1, 50, 5.
Open cbg_bythesea_bubbles01. Copy & paste onto your canvas. Resize 50% then 80% all layers NOT checked. Place in upper right. Duplicate, mirror. Duplicate original again and rotate 45%. Merge all 3 bubble layers, add a drop shadow of 2, 2, 50, 5.
Open cbg_bythesea_frame02. Copy and paste onto your canvas. Rotate right 35%.
Open Use your magic and click inside both frame holes. Selections, modify, expand by 12. Keep repeating expand until you get the ants to cover all the inside of your frame. This will make it have the ants outside the frame itself in a few places. Open paper cbg_bythesea_paper02. Resize 99%, then 75% all layers checked. Copy & paste onto canvas and place under frame. Resize until you get the picture you want. Selections, invert, hit delete key on keyboard. Selections, select none.
Open cbg_bythesea_lighthouse. Copy and paste onto your canvas. Resize 80% and place to the right of frame.
Open the following elements and copy and paste them onto your canvas, one at a time. Resize each one to your liking and place where you want them.
Cbg_bythesea_scpoe
Cbg_bythesea_shell01
Cbg_bythesea_shell02
Cbg_bythesea_shell03
Cbg_bythesea_shell04
Cbg_bythesea_ball01
Cbg_bythesea_bird01
Cbg_bythesea_bird02 Mirror both birds
Give each of your elements and frame a drop shadow of 2, 2, 50, 5.
Open up cbg_bythesea_sand. Copy and paste sand onto your canvas 4 times. Rearrange sand to your liking. Merge all sand together and add drop shadow of 1, 1, 50, 5.
Open up tubes. Copy and place where you want them. Resize as needed. Place a drop shadow of 2, 2, 50, 5.
Mask and sand have a drop shadow of 1, 1, 50, 5. Everything else has a drop shadow of 2, 2, 50, 5.
Here I save it in psp form to move things if need be. Merge visible, resize 97% all layers NOT checked. Resize again down so your canvas is not larger than 525 x 525.
Add your copyright info, add name (I put a glow on my name, see below), and we are done.

 I hope you enjoyed my tut.
If you do any of my tuts please send to me at my email addy of glitterdeb75@yahoo.com and I will put them on my blog.
I hope you enjoyed my tut.
If you do any of my tuts please send to me at my email addy of glitterdeb75@yahoo.com and I will put them on my blog.
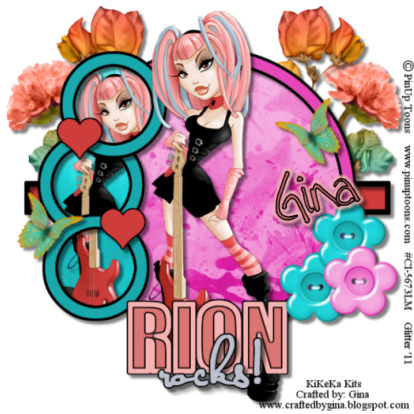
Wednesday, July 20, 2011
This tut is entirely my own creation. Any resemblance is purely coincidental. I will try to write this so that the beginner tagger can understand it.
 Supplies
Scrap Kit: Oh Lollipop by KiKeKa Kits
HERE
Tube: I am using one of PinUp Toons. You need a license to buy and use this tube. I bought mine at CILM, but you can get it at CDO
HERE
Template: CBN_Template17 by Deb
This blog site is closed, sorry. If you want the template just let me know.
Font: Tall Paul
HERE
Let’s Begin
Open template 17. Shift D to duplicate template. Close out original. On duplicate template delete copyright layer. Go to Image, canvas size 760 x760. I like to work on large canvases, we will resize at end.
Cbg_ohlollipop_paper10
Resize 22 % all layers checked.
Resize 75% all layers checked.
Adjust, hue and saturation
Hue: 225 Saturation: 197
Paper is now pink.
Raster 2: Selections, select all, float, defloat, copy and paste colorized paper. Selections, invert, hit delete key on keyboard. Select none.
Copy of vector 1. Selections, float, defloat, modify, expand by 4. New canvas, flood fill with color #e648b8. Copy and paste on template canvas. Selections, invert, hit delete key on keyboard. New canvas, flood fill with black.
Go to new pink circle, selections, float, defloat, modify, expand by 4. Copy and paste black onto template canvas. Selections, invert, hit delete key on keyboard. Select none.
Add drop shadow 5, 5, 50, 5.
Copy and paste tube onto template, place on top of pink circle. Resize 115%, adjust, sharpness, sharpen. Add drop shadow as listed above.
Cbg_lollipop_paper02
Resize 22% all layers checked.
Resize 75% all layers checked.
Adjust, hue and saturation
Hue: 129 Saturation: 197
Paper is now blue.
Do the following steps to raster 3, copy of raster 3 and copy 2 of raster 3.
Selections, float, defloat, copy and paste blue paper, selections, invert, hit delete key on keyboard, select none.
Go to the pink circle, selections, float, defloat, modify, expand by 4. Copy and paste black, invert, hit the delete key on keyboard. Select none. Move black circle below pink circle. Add drop shadow.
New canvas, flood fill with #19a9ad (blue).
Do the following steps to these layers, copy of vector 1, copy 2 of vector 1 and copy 3 of vector:
Selections, float, defloat, modify, expand by 4, copy and paste blue, invert, hit delete key on keyboard. Select none.
On each of the blue ring frames do the following: Selections, float, defloat, modify, expand by 4, copy and paste black, invert, hit delete key on keyboard. Move black circle below blue circles. Add drop shadow.
In each of the blue circles do the following: selections, float, defloat, tube positioned to your liking, invert, hit delete key on keyboard. Add drop shadow.
New canvas, flood fill with #da7673. Go to raster 5, selections, float, defloat, copy and paste coral color, selections, invert, hit delete key on keyboard.
New canvas, flood fill with #cf9392. Go to new Rion layer, selections, float, defloat, modify, expand by 4, copy and paste light coral color, invert, hit delete key on keyboard. Selections, float, defloat, modify, expand by 2, copy and paste black, selections, invert, hit delete key on keyboard. Move black below light coral layer. Add drop shadow.
New canvas, flood fill with #bcc1cd. Go to raster 6 selections, float, defloat, modify, expand by 1. Copy and paste light blue, invert, hit delete key on keyboard. Add drop shadow. Stay on this layer, selections, float, defloat, modify, expand by 2, copy and paste black, invert, hit delete key on keyboard. Move black below light blue layer. Add drop shadow.
New canvas, flood fill with #ce3c3b. On both raster 4 and copy of raster 4 do the following: Selections, float, defloat, copy and paste red color, invert, hit delete key on keyboard. Stay on this layer, selections, float, defloat, modify, expand by 2, copy and paste black, invert, hit delete key on keyboard. Move black layer below red layer. Add drop shadow.
Go to raster 1 layer. Selections, float, defloat, copy and paste red, invert, hit delete key on keyboard. Go to copy of vector 1, selections, float, defloat, modify, expand by 2, copy and paste black, invert, hit delete key on keyboard. Add drop shadow.
Cbg_ohlolloipop_bougainville03
Resize 38% all layers checked.
Resize 50% all layers checked.
Copy and paste as new layer, bring to top of layers, move to the right upper corner, send to bottom, duplicate, mirror. Add drop shadow on both.
Cbg_lollipop_butterfly02
Resize 94% all layers checked.
Resize 50% all layers checked
Repeat resize 50%, resize 50% again.
Copy and paste as new layer, bring to the top, move to right of tag, duplicate, mirror, place both to your liking. Add drop shadow on both.
Cbg_lollipop_flower05
Resize 59% all layers checked.
Resize 50% all layers checked.
Copy and paste as new layer, bring to the top, move to the right and place to your liking. Duplicate, mirror, drop shadow both.
Cbg_lollipop_button03
Colorize blue as before
Resize 50% , then resize 75% all layers checked
Copy and paste as new layer, move to bottom right.
Duplicate, an place both to your liking.
Colorize button03 pink as before. Copy and paste as new layer, move on top of blue buttons. Add drop shadow to all three.
Add copyright and name.
Supplies
Scrap Kit: Oh Lollipop by KiKeKa Kits
HERE
Tube: I am using one of PinUp Toons. You need a license to buy and use this tube. I bought mine at CILM, but you can get it at CDO
HERE
Template: CBN_Template17 by Deb
This blog site is closed, sorry. If you want the template just let me know.
Font: Tall Paul
HERE
Let’s Begin
Open template 17. Shift D to duplicate template. Close out original. On duplicate template delete copyright layer. Go to Image, canvas size 760 x760. I like to work on large canvases, we will resize at end.
Cbg_ohlollipop_paper10
Resize 22 % all layers checked.
Resize 75% all layers checked.
Adjust, hue and saturation
Hue: 225 Saturation: 197
Paper is now pink.
Raster 2: Selections, select all, float, defloat, copy and paste colorized paper. Selections, invert, hit delete key on keyboard. Select none.
Copy of vector 1. Selections, float, defloat, modify, expand by 4. New canvas, flood fill with color #e648b8. Copy and paste on template canvas. Selections, invert, hit delete key on keyboard. New canvas, flood fill with black.
Go to new pink circle, selections, float, defloat, modify, expand by 4. Copy and paste black onto template canvas. Selections, invert, hit delete key on keyboard. Select none.
Add drop shadow 5, 5, 50, 5.
Copy and paste tube onto template, place on top of pink circle. Resize 115%, adjust, sharpness, sharpen. Add drop shadow as listed above.
Cbg_lollipop_paper02
Resize 22% all layers checked.
Resize 75% all layers checked.
Adjust, hue and saturation
Hue: 129 Saturation: 197
Paper is now blue.
Do the following steps to raster 3, copy of raster 3 and copy 2 of raster 3.
Selections, float, defloat, copy and paste blue paper, selections, invert, hit delete key on keyboard, select none.
Go to the pink circle, selections, float, defloat, modify, expand by 4. Copy and paste black, invert, hit the delete key on keyboard. Select none. Move black circle below pink circle. Add drop shadow.
New canvas, flood fill with #19a9ad (blue).
Do the following steps to these layers, copy of vector 1, copy 2 of vector 1 and copy 3 of vector:
Selections, float, defloat, modify, expand by 4, copy and paste blue, invert, hit delete key on keyboard. Select none.
On each of the blue ring frames do the following: Selections, float, defloat, modify, expand by 4, copy and paste black, invert, hit delete key on keyboard. Move black circle below blue circles. Add drop shadow.
In each of the blue circles do the following: selections, float, defloat, tube positioned to your liking, invert, hit delete key on keyboard. Add drop shadow.
New canvas, flood fill with #da7673. Go to raster 5, selections, float, defloat, copy and paste coral color, selections, invert, hit delete key on keyboard.
New canvas, flood fill with #cf9392. Go to new Rion layer, selections, float, defloat, modify, expand by 4, copy and paste light coral color, invert, hit delete key on keyboard. Selections, float, defloat, modify, expand by 2, copy and paste black, selections, invert, hit delete key on keyboard. Move black below light coral layer. Add drop shadow.
New canvas, flood fill with #bcc1cd. Go to raster 6 selections, float, defloat, modify, expand by 1. Copy and paste light blue, invert, hit delete key on keyboard. Add drop shadow. Stay on this layer, selections, float, defloat, modify, expand by 2, copy and paste black, invert, hit delete key on keyboard. Move black below light blue layer. Add drop shadow.
New canvas, flood fill with #ce3c3b. On both raster 4 and copy of raster 4 do the following: Selections, float, defloat, copy and paste red color, invert, hit delete key on keyboard. Stay on this layer, selections, float, defloat, modify, expand by 2, copy and paste black, invert, hit delete key on keyboard. Move black layer below red layer. Add drop shadow.
Go to raster 1 layer. Selections, float, defloat, copy and paste red, invert, hit delete key on keyboard. Go to copy of vector 1, selections, float, defloat, modify, expand by 2, copy and paste black, invert, hit delete key on keyboard. Add drop shadow.
Cbg_ohlolloipop_bougainville03
Resize 38% all layers checked.
Resize 50% all layers checked.
Copy and paste as new layer, bring to top of layers, move to the right upper corner, send to bottom, duplicate, mirror. Add drop shadow on both.
Cbg_lollipop_butterfly02
Resize 94% all layers checked.
Resize 50% all layers checked
Repeat resize 50%, resize 50% again.
Copy and paste as new layer, bring to the top, move to right of tag, duplicate, mirror, place both to your liking. Add drop shadow on both.
Cbg_lollipop_flower05
Resize 59% all layers checked.
Resize 50% all layers checked.
Copy and paste as new layer, bring to the top, move to the right and place to your liking. Duplicate, mirror, drop shadow both.
Cbg_lollipop_button03
Colorize blue as before
Resize 50% , then resize 75% all layers checked
Copy and paste as new layer, move to bottom right.
Duplicate, an place both to your liking.
Colorize button03 pink as before. Copy and paste as new layer, move on top of blue buttons. Add drop shadow to all three.
Add copyright and name.
 That’s it. Hope you enjoy my tut.
Tuesday, July 19, 2011
 This is entirely my creation. Any resemblances are purely coincidental. I have tried to write this in simple steps so even the beginner can understand it. Supplies Scrap kit: Lollipop by KiKeKa Kits HERE Tube: I am using one from Joel Adams, a personal commission. Any tube will work. Font: Walt Disney Script Mask: WSL_84 by Weescotlass HERE Let’s begin Open a new canvas 600 x 600 Cbg_lollipop_paper13 Resize 22% resize all layers checked Copy and paste as new layer Open mask 84 Layers, new mask layer, from image Merge group. Apply a drop shadow of 1, 1, 50, 5. Open cbg_lollipop_spots02 Resize 33% all layers checked Resize 50% all layers checked Copy and paste on to top of mask layer. Position to the right top Duplicate layer, mirror. Merge down. Duplicate this layer. Flip and mirror. Merge down. Apply drop shadow of 5, 5, 50, 5 Open cbg_lollipop_frame01 Resize 38% all layers checked Resize 50% all layers checked Copy and paste on top of spots. Use magic wand inside frame. Selections, modify, expand by 8. Open cgb_lollipop_paper14. Resize 22% all layers checked. Resize 50% all layers checked. Copy and paste as new layer. Position below frame and arrange to your liking. Selections, invert, hit delete key on keyboard. DO NOT DESELECT. Here you place the tube of your choice and place under frame. Duplicate tube and place on top of frame. Close the eye on the layers palette on the right of psp. Go back to original tube layer and hit delete key on keyboard. Go to copy of tube and add a drop shadow of your choice. I used 5, 5, 50, 5 on all items from here on out. Use eraser to erase all the unwanted parts of the tube. The following elements can be placed around frame as you like. This is only a guide, I will tell you how I resized them all. Apply drop shadow to all. Cbg_lollipop_girl02 Copy and paste as new layer. Resize by 50%, then by 75% All layers NOT checked. Rotate 20 degrees to the left. Cbg_lollipop_lollipop04 Resize 72% all layers checked. Copy and paste as new layer. Resize 50% all layers NOT checked Repeat resize 50%, then resize 75% All layers NOT checked. Cbg_lollipop_02 Resize 64% all layers checked. Copy and paste as new layer. Resize 50% all layers NOT checked. Repeat resize 50%, then resize 75%. Rotate left 15 degrees. Cbg_lollipop_lollipop06 Resize 66% all layers checked. Copy and paste as new layer. Resize 50% all layers NOT checked. Repeat resize 50% then resize 75%. Rotate to the right 15 degrees. Cbg_lollipop_icecream02 Copy and paste as new layer. Resize 50%, repeat resize 50%, Then resize 80%. Duplicate, mirror. Cbg_lollipop_icecream Copy and paste as new layer. Resize 50%, repeat resize 50%. Cbg_lollipop_flower02 Resize 91%, all layers checked. Resize 50%, repeat resize 50%. Copy and paste as new layer. Resize 50% all layers NOT checked. Resize 75%. Duplicate, flip. Cbg_lollipop_flower04 Resize 96% all layers checked. Resize 50%, repeat resize 50%. Copy and paste as new layer. Resize 50% all layers NOT checked. Resize 75%. Cbg_lollipop_dragonfly02 Resize 76% all layers checked. Resize 50%, repeat resize 50%. Copy and paste as new layer. Resize 50% all layers NOT checked. Resize 75%. Cbg_lollipop_candy04 Resize 44% all layers checked. Resize 50%, repeat resize 50%. Copy and paste as new layer. Resize 50% all layers NOT checked. Resize 95%. Cbg_lollipop_brad02 Resize 50% all layers checked. Repeat resize 50%. Copy and paste as new layer. Resize 50% all layers NOT checked. Resize 50% Cbg_lollipop_brad04 Resize 50% all layers checked. Repeat resize 50%. Copy and paste as new layer. Resize 50% all layers NOT checked. Resize 75%. Cbg_lollipop_balloons Resize 40% all layers checked. Resize 50%, repeat resize 50%. Copy and paste as new layer. Resize 75% all layers NOT checked. Merge visible. Add your copyright. Save in png or jpeg format, whichever you prefer. Add your name. I added a glow to my name 7 medium. That’s it. Simple.
  I hope that you enjoy my tut as much as I did writing it.
Subscribe to:
Posts
(Atom)